The feeling I get while sitting down at a Mexican restaurant and being graced with unlimited baskets of tortilla chips and those little faux-molcajetes of salsa roja — or red salsa — comes second to none. I’ve completely stuffed myself on complimentary chips and salsa more times than I’d like to admit. This starter is the perfect balance of flavors — the grease of the tortilla chips is cut with the acidity of tomatoes and lime, and balanced by the brightness of fresh cilantro and the heat of jalapeño peppers. The combination makes for a truly perfect dish.
The popularity of tomato-based salsa in conjunction with tortilla chips is uniquely Mexican-American. In Mexico, it is somewhat unlikely to eat salsas in the sheer quantity that Americans eat them when served alongside a pile of chips. Instead, salsas act as a true condiment instead of a side dish, sprinkled over a taco or used alongside grilled meat dishes. In an interview for the New York Times in 2010, Oaxaca University student and aspiring chef Javier Olmedo said: “Watching someone shovel in salsa with tortilla chips is strange to Mexicans. Like how an American would feel watching someone drink salad dressing out of the bottle.” And while it may be considered more American than Mexican to guzzle salsa, I still consider drinking the spicy sauces one of my favorite pastimes. A little left in the bottom of the jar? I will happily swig it. Small takeout containers filled with tangy, saucy goodness? I will, unabashedly, take them like a shot.
The popularity of salsas in the States is a nod to both a growing Latino demographic and a widespread desire for readily accessible Mexican-American food. The tomato-based and barely-spicy version of the Mexican condiment gradually became so popular in the U.S. that in 1992, it dethroned ketchup as the country’s most popular condiment. In a nation that has grown to be almost 20 percent Hispanic or Latino, it’s no surprise that Latino foods have been deemed more popular than many of their American counterparts (since 2013, more tortillas have been sold per year than hotdog buns). The growth of the Latino population in the United States brought a shift in consumer tastes over the years, and led to the increasing demand for Mexican food.
The surging popularity of easy-access Mexican foods, like frozen burritos and taquitos at every corner store, brings up the question of alleged authenticity of available Mexican cuisine in many. What foods are really Mexican? Is Tex-Mex even Mexican? Are the beloved Mexican-American combo platters loaded with yellow cheese and red salsas even true to the essence of Mexican cooking? In the eternal struggle for this so-called authenticity, some will say that the combination of chips and salsa is not Mexican at all, while others are quick to denounce a Mexican restaurant as inauthentic if there are no baskets of chips and bowls of salsa served before a meal.
This perverse lens of authenticity that is so often looking for “real Mexican food” discredits the cultures of Tex-Mex and Mexican-American foods as truly Mexican. Mexican-American foods historically have been viewed as a lower-quality, less authentic form of Mexican food, but in reality, Tex-Mex, New Mexican and Southern California Mexican foods are all true regional cuisines. They’re all products of different combinations of Mexican roots, colonialism and the altering of Mexican dishes to suit American tastes. So when the New York Times says that some diners see authenticity when chips and salsa are not on the table, they should remember that Mexican-American foods, like chips and salsa, are symbols of the flexibility and adaptability of Mexicanidad in the United States.
While salsa as a dip can be traced more recently to the 1980s in the United States, the origins of the sauce go as far back as Aztec, Incan and Mayan civilizations. In 1571, Alonso de Molina, a Spanish Franciscan priest, coined the Indigenous Mexican condiment “salsa,” which translates directly to “sauce.” Although in Spanish salsa can mean a variety of different sauces, in the U.S. it most frequently refers to the table sauces used as dip for tortilla chips or as toppings for various Mexican dishes like tacos, taquitos and tortas. Mexican-American salsa roja as we know it in America, has roots in Texas, where brands like El Paso Chile Company and Pace Foods started manufacturing the tomato-based salsas in bulk in the 1980s.
My family probably visits more Mexican restaurants than all other cultural restaurants combined. My grandparents will only dine at Mexican restaurants or the one Italian-American red-sauce eatery they’ve been going to since the 1960s. Once, My mom, sister, and I took them to a Japanese restaurant, but their Mexican tastes were only more confused at the sight of nori and kikurage mushrooms. They haven’t been back since.
The Mexican-American restaurants my family has frequented over the years all have similar things in common: a killer enchilada combo plate, deeply savory chile verde, a good house margarita, and unlimited chips and salsa on the table. Places like San Fernando’s Presidente, Palmdale’s El Toreo, and the gone but never forgotten Nacho’s of Granada Hills, have given us a lifetime of perfect tomato-based salsas. Different from the more punchy and forward flavor profiles of taqueria salsas, restaurant style salsa roja is the equivalent of easy listening music for your mouth. The perfect balance of spicy, sour and crisp paired with greasy and crunchy tortilla chips makes for an appetizer that can, quite literally, be eaten all day every day.
But my familia’s salsa habits aren’t restricted to meals at our local haunts — my abuelo makes a mean homemade salsa roja. A true perfectionist, he is forever tinkering with the recipe. We always joke that he makes it a little different every time. Whenever my grandparents visit my Mom’s California home for a barbeque, my abuelo, or “Poco” as we call him, brings along a tiny hard-shell ice chest full of his salsa ingredients. Fresh cilantro, garlic, onions, canned tomatoes and jalapeños are always packed lovingly into the little chest. We endearingly call him “salsa man” or “salsa guy” when he gets into the kitchen to make the tangy, spicy condiment. A man of few words, Abuelo simply nods in acknowledgement to the title bestowed upon him and goes about his salsa-making duties.
While my grandpa makes many different deeply flavorful salsas — from rich red chile sauces used in pozole, to tart and smoky tomatillo salsa verdes — the salsa that he silently places at the table most often is essentially a partially-blended, sweeter pico de gallo. Pico de gallo (or salsa fresca as it’s referred to in Mexico) is arguably the simplest Mexican salsa. Tomatoes, onions, cilantro and jalapeños are roughly chopped and then tossed with garlic, lime juice and salt. My grandpa’s version takes a simple pico de gallo a bit further.
Inspired by the chips and salsa appetizers served in Mexican-American restaurants in California’s San Fernando Valley, Abuelo’s salsa gives canned and fresh tomatoes the royal treatment. The two tricks to perfect salsa texture are seeding your tomatoes and making sure not to over-blend the mixture. Spooning out the liquidy tomato insides and opting for a pulse instead of a true blend will keep your salsa restaurant quality.
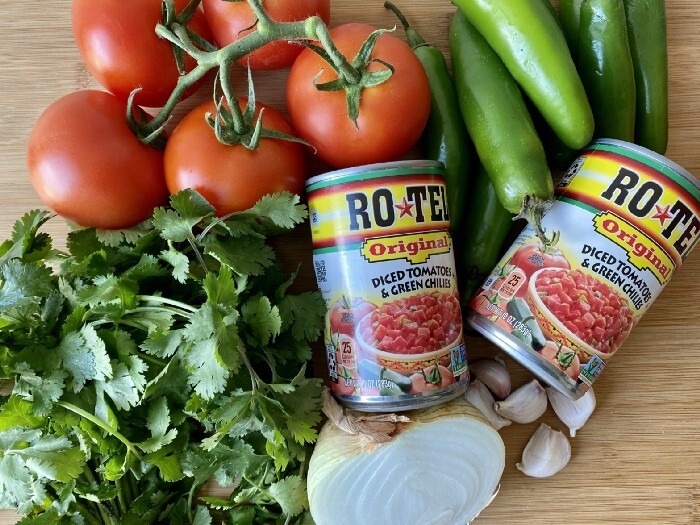
Photo by Jae Thomas.
Restaurant Style Salsa Roja (Red Salsa)
Yield: About 2 cups of salsa
Time: 30 minutes
Ingredients
- 28 oz. whole peeled canned tomatoes, drained OR 5-6 large tomatoes
- 16 oz. Rotel diced tomatoes with diced chilies, drained
- 3-5 Serrano or Jalapeño peppers, depending on desired spice level. Seeded if desired.
- 1 lime, halved
- 6-7 cloves garlic, roughly chopped
- ½ yellow onion, peeled but left intact
- ½ cup cilantro leaves and tender stems, finely chopped
- 1 tbsp. Mexican oregano
- Salt, to taste
Photo by Jae Taurina Thomas
Preparation
Step 1
Heat a comal or large cast iron pan* over medium-high heat. Place a piece of foil over the comal or pan.
*Alternatively, you can also do this over a direct flame, but keep in mind that the cooking time will be drastically reduced.
Step 2
Place fresh tomatoes, if using, whole or seeded chiles, and halved onion over the foil. Flip every 3-4 minutes, roasting until deeply charred on all sides, about 20 minutes total.
Step 3
Slice all tomatoes in half and scoop out the seeds and liquid insides. Discard seeds. Place seeded tomatoes in a mesh colander. Pour in the drained can of Rotel. Using your hands, squeeze out as much liquid as possible. (This step is required for both canned and fresh roasted tomatoes.)
Step 4
Place the tomato mixture, garlic, chiles and oregano in a blender. Pulse a few times until combined, careful not to overblend. Pour into a bowl.
Step 5
Finely mince the roasted onion. Then, with a spoon, stir to combine chopped cilantro and onion to tomato mixture. Squeeze in half to a whole lime until you achieve desired acidity. Salt to taste.
Homemade salsa roja will keep in the fridge for about a week.
After washing my face with a gentle cleanser, patting on a toner, moisturizer, and sunscreen, I would sit at my desk with a table mirror right in front of me. With my curtains wide open so natural light gushed in, I’d start dabbing concealer under my eyes. Then came bronzer, eyebrow gel, highlighter, mascara, and tinted lip balm. When I was done, I’d glance at my reflection with a reassured smile. Five to seven days a week, for several years, my makeup brushes and a small mirror let me assemble the person I was. That is, until New York City went into lockdown.
I suddenly had no job, no meetings, no brunches to get ready for. No need to wear makeup — the only commuting I had to do was from my bed to my couch. And no excuse to hide my insecurities.
Growing up, two opposing forces defined my relationship with makeup. One was my strict mother who insisted I should never wear it to school. This guaranteed I had nothing more than an eyeliner and a chapstick on my face until senior prom. The other was how the misogynistic culture of the Republic of Georgia — the country I called home for 19 years — forced me to internalize that my looks were the most important thing about me.
A very specific image of beauty reigned amongst Georgian teens. A thin (but fit) body, above-average height, long hair were among the most prized traits. If any woman deviated from the standard, that insolent characteristic which dared not to conform, would be one of the first things mentioned about her. “She has a pretty face. if only she was thinner.” Sometimes “thinner” could be “a bit taller.” Or it was the other way around: “Too bad her nose is not that nice, her body is beautiful.” Anything larger than Natalie Portman’s slim, button nose was considered “not that nice.” God forbid you ever had any body hair showing.
I was mostly fine: I was skinny, athletic, not too short. My nose, while not small and delicate, wasn’t so bad. In addition, I had good grades, close friends, and a fair number of admirers, all of which kept my big ego mostly sated (Leo Sun check.) But that wasn’t enough. The culture had taken its toll. I had subconsciously subscribed to the notion that I needed to be “perfect.” And to achieve that, I had to look perfect. And the only thing that would make me look perfect, according to another ironclad Geogrian standard, was one thing my mother contended against: makeup. So while I considered myself pretty, I always greedily awaited the time when I would finally be allowed to powder and pencil my way to near-perfection. I wholly believed that next-level beauty — and therefore success — could be attained only by my ability to create a smokey eye, a contoured cheekbone, a red lip.
That time came freshman year of college. I was living in New York, away from my mother’s rules. I splurged on a Becca foundation and a Smashbox contour kit, and slathered the full-coverage base all over my face, blending it in as much as I could with my fingers. I sucked in my lips, making a fish face, and used the only brush I bought to darken the hollows that formed. Then I smiled, using a slightly warmer tone in the kit for the apples of my cheeks. For the grand finale, I brought the hand mirror very close to my face, widened my eyes and repeatedly glided a mascara-coated wand along my lashes. With my “imperfections” covered up, my pale face bronzy, I felt complete. So polished, professional, beautiful. This, I thought, was the potential I had been waiting to tap into. As if giving me superpowers, makeup surged my self-confidence, making every goal I had feel a lot more reachable.
But Newton didn’t lie when he said every action has an equal and opposite reaction. With the newfound sense of possibility and elevated self-confidence came an equally impactful feeling of powerlessness whenever the makeup came off. Everything on my face that wasn’t foundation-colored became wrong. The natural rosiness of my cheeks — present on anyone’s bare cheeks — was so unnatural that for a little while I convinced myself I had rosacea. When I covered my barely-there pimples, I felt invincible, but if ever I lacked a vanity full of products to prepare me for the day, I felt defective. On days without makeup, I sat in the back of the class, not participating in discussions. I put my head down when I walked, avoiding eye-contact. I prayed I didn’t run into anyone I knew.
So the first days of the lockdown were rough, to say the least. In a face staring at me from behind the mirror, I saw wasted potential. Someone who could be beautiful, powerful and successful, but wasn’t allowed to be anymore. I waned and either avoided mirrors or filled with self-pity if I caught my reflection in one.
But as days turned into weeks, I got used to seeing my “fresh” self again. With the lengthy absence of concealer under my eyes and highlighter on my cheeks, I almost forgot what I looked like with makeup on. Instead, I remembered myself in high school. Makeup-less, but top of the class. Missing mascara, but leading discussions. Never insecure during presentations. Contour or not, knowing success was mine for the taking. Yet, I would look and primarily see what wasn’t there: a set of products that blend into a small part of my body, making it appear slightly more tan. When I decided that my made up self would be my everyday normal, I also consented to make the “Me” without it abnormal and insufficient. When that “normal” redefined itself during the lockdown, so did my attitude towards it. Seeing my face, day after day, without any makeup reminded me, as I had let myself forget, of what I really looked like: pretty damn similar (albeit a little less glossy.)
Fifteen minutes in the morning, while helping set me off, didn’t grant me permission to become who I already was: a writer, a cinephile, a bookworm. An overthinker and a control-freak. Someone who made a home in a strange country at 19. A hopeless romantic. A supportive friend. A lover of all things bougie. Makeup didn’t actualize that. It didn’t even substantially change my face. And while I yearn to highlight the hell out of my face again, I realized I should’ve never allowed that to become the tool to harness power and self-worth, regarding myself as incomplete until makeup became part of my day-to-day.
The outbreak of COVID-19 in the United States wreaked havoc on minority communities, causing long-existing systems of racism and oppression to permeate deeper into the lives of the country’s most vulnerable. As it transformed New York into a global hotspot for the disease, the virus caused the city’s growing food insecurity problem to get even worse. The pandemic exposed how significantly disproportionate the problem is for low-wage and minority communities, increasing the number of New Yorkers left without access to affordable, healthy food from around one million to more than two.
In an effort to diminish the impact of the issue, local activists and community organizers took action by installing community fridges in neighborhoods across the city. By offering fresh produce, prepared meals, and pantry staples that are free to all, the fridges have become an increasingly popular mutual aid effort to combat food insecurity and food waste.
Sara Allen, a volunteer with The Friendly Fridge BX was inspired when they saw a friend’s Instagram post about the first community fridge in Manhattan. Just three days later, they had a fridge up and running in their own neighborhood. “Regular folks can do it,” Allen told The Interlude.
But where should you start?
After speaking with several organizers from neighborhoods across the city, The Interlude has put together the following guide to starting your own community fridge.
Do Your Research
First, you should familiarize yourself with the core concepts that make community fridges effective. Read up on the ideas behind mutual aid systems, a community-centered method of direct action that encourages individuals to care for each other and work together to address their community’s most pressing needs. Think about how to promote solidarity rather than charity. In efforts of solidarity, unlike in charity, the savior complex is eliminated. There is no one in charge and no policing of how people choose to engage. Everyone can give and everyone can take.
“There’s a lot of pride, shame, and guilt [associated with] anything that is given away for free,” explained Sade, an activist, artist, and volunteer with The Harlem Community Fridge. “People become a little suspicious — ‘Is it good enough?’ Or there are other attachments, like if you accept something that’s free, that means that you’re poor…[s]o there’s a lot of stigma and preconceived, indoctrinated ideas that we as a society have to work through.”
Developing a foundational understanding of these ideas is necessary to building an effective mutual aid program, such as a community fridge.
Connect With Other Organizers
Most community fridge organizers are very active on social media, especially Instagram (All of the organizers that The Interlude spoke with for this guide were contacted via Instagram.) They make themselves available to answer questions or help connect interested volunteers with resources. Sg Guerrero, an organizer who helped start The Uptown Fridge in Washington Heights, initially saw an Instagram post from the activism network In Our Hearts NYC that was offering a free fridge. IOH provided Guerrero with the fridge and even coordinated a group chat with other Washington Heights residents looking to start a community fridge. IOH encourages anyone interested in starting a community fridge to message their Instagram account or send an email to inourhearts@gmail.com. Other networks, like FREEdge, offer resources like micro-grants, templates for informational flyers and posters, and a comprehensive guide to understanding and building community fridges.
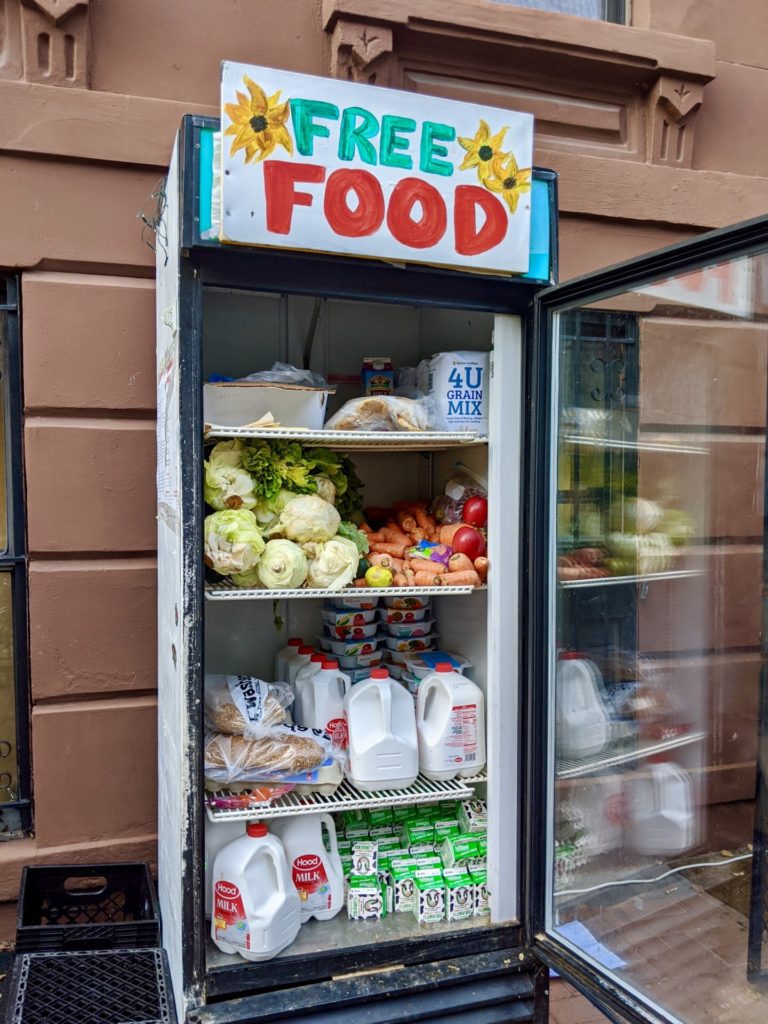
Photo by Opheli Garcia Lawler.
Take Care of the Logistics
After you’ve reached out to other organizers and volunteers to start building a team, it’s time to focus on the logistics — how will volunteers communicate? Where can the fridge be plugged in? When will the fridge be cleaned and restocked? Most organizers recommend starting a group chat on a messaging platform like Signal so that team members can easily contact each other and share information.
Then it’s time to find an outlet for the fridge. The majority of fridges in New York are plugged in at a small local business like a deli or a bodega. While looking for an outlet for The Friendly Fridge BX, Sara and their partner Selma Raven simply walked up and down the block introducing themselves to business owners and asking for their help providing electricity. Some people will be very skeptical and unwilling, they both warned. But just keep trying and you’ll find someone who is excited to be involved. Extension cords will be necessary, but make sure everything is connected safely. Don’t plug an extension cord into another extension cord, and make sure the outlet is not being used to power other appliances.
Once the fridge is plugged in, allow 24 hours for it to cool before stocking with food. All food in the fridge should be clearly labeled with expiration dates and regular cleaning of the fridge should be coordinated by team members. Aditi Varshneya, another organizer with The Uptown Fridge, suggests starting with a Google Spreadsheet that displays who can take care of specific duties on what dates and times. It’s also important to appoint one or two people to oversee monetary donations, which community members typically contribute via Venmo. Lastly, make your fridge visible. Use bright colors and encouraging messages to communicate to anyone passing by that the food inside is free and available to everyone.
Involve Your Community
The inclusion of the whole community is the most important step to a successful fridge. Make connections with bakeries, grocery stores, restaurants, corner stores, and food pantries in the area and offer to coordinate regular pick up times to collect donations. You can also ask these businesses to put up posters with information about the fridge. But always keep in mind that no donation is too small. Encourage friends and neighbors to drop off that stray can of beans they don’t need or check for buy-one-get-one deals at the grocery store and donate the extra item.
“We can all do something. Everybody can contribute,” Sade told The Interlude. “It’s not just for businesses with money. Maybe one day you’re leaving something and the next day you come and pick something up. There’s no questions asked.”
Commit to Doing the Work
Community fridges are about more than feeding the hungry. The fridges fight issues deeply ingrained into American society, like food insecurity, food waste, and food apartheid — the systemic inaccessibility of affordable, healthy food options that disproportionately affects black and brown communities. Anyone who’s thinking about starting a community fridge in their neighborhood should consider these issues and be ready to commit to long-term activism in the form of re-educating one’s community about our country’s food systems.
“[We’re addressing] health disparities, accessibility of healthy food options, and offering people better ways to eat,” Sade said. “When you do this kind of work, you’re really helping to mend and build bridges. Food is the connector between all people.”
Why are Mexican home cooks always in panic over their beans? The TikTok trend that shows Mexican folks going about daily activities, before tripping over themselves in realization that the frijoles are burning, is a lighthearted nod to how frijoles, or beans, are almost always cooking in Mexican households. But a simmering pot of beans can take hours to fully cook, leaving plenty of time to forget it’s even sitting on the stove. I often find myself neglecting my pot until the smell of crispy frijoles demands I make a mad dash to the kitchen to add more water to the pot.
Beans, especially the pinto variety, are crucial to Mexican cuisine. Stewed over a few hours, pinto beans can be served whole and fried (frijoles chinos) or mashed and refried (frijoles refritos). Frijoles are eaten with almost every main course alongside arroz. In many Mexican restaurants in America, refried beans are served with a layer of melty, gooey, shredded cheese on top. This is a style characteristic to the Southwestern United States, especially at restaurants specializing in Tex-Mex cuisine. In Mexico, as well as in more traditional Mexican-American restaurants and households, frijoles refritos may be garnished with queso fresco.
Whole and fried beans, or frijoles chinos, are the first step to making refried beans. The stewed beans are heated in fat, usually lard or leftover bacon grease, until they begin to crisp on the outside. The name for this simple method of preparation, however, has a turbulent history rooted in the African slave trade in Mexico. Historically, frijoles chinos may have been named as such for the way the bean consistency resembled the curly texture of African slave’s hair in the 16th and 17th centuries. This history is important for Mexican culture, as it helps Mexican people reckon with the country’s involvement in the slave trade. It’s also a way to study how connotations of certain words still hold tinges of colorism in present day Spanish.
Understanding frijoles chinos requires an understanding of linguistic history of the Spanish word “chino.” From the late 16th to the 18th century, Mexican colonial documents often mistranslated “chino” to “Chinese.” In the Journal of Pan African Studies, Professor of Spanish, Marco Polo Hernández Cuevas, discusses the term and its history, stating that generally, “chinos” were Afro-Mexican “chinos-cambujos” or biracial people. Cuevas goes on to say that in New Spain archival records, the term “Chino” was used by Spanish colonizers to refer to Mestizo, or mixed-race Mexicans whose blood was “tainted” by African blood. “Chino” is historically a synonym for pig in Murcia, Spain, and Cuevas says that while the term’s “animal connotation” is no longer used, the racist implication of the word still exists in Mexico. For example, curly hair may be described as pelo chino, and the slang word for nasty is cochino.
Additionally, the linguistic study of food terms helps reveal other misinterpretations of the Mexican dish names. The English term “refried beans” is also a mistranslation, this time of the Spanish term “frijoles refritos,” which translates more directly to “well-fried” beans. The beans aren’t actually fried twice — as suggested by the prefix “re” — but cooked, fried in fat (usually lard or bacon grease) and mashed with their cooking liquid until smooth.
Refried beans were an essential in my home and my grandparents’ home as I was growing up. On car rides home from elementary school, like every other kid, I’d ask my mom to stop for fast food for dinner and was instead met with a stern “we have food at home.” That food usually consisted of some version of a pot of leftover beans and tortillas. I used to joke that this was all my mom ever ate, but as I’ve gotten older, I’ve realized that refried beans in a tortilla tastes like pure comfort.
My mom was a working single mother of two, so she often didn’t have the time or energy to slow cook a sumptuous pot of frijoles. As a solution, my abuela cooked huge pots of the cafe-con-leche colored beans and brought them over, almost weekly. In the summers of my childhood, when I stayed longer stretches of time at her home, I’d help her with the frijoles. I was always tasked with sorting the individual beans. My abuela poured out huge bags onto the bare counter, telling me to pick out any rocks, sticks or broken bits.
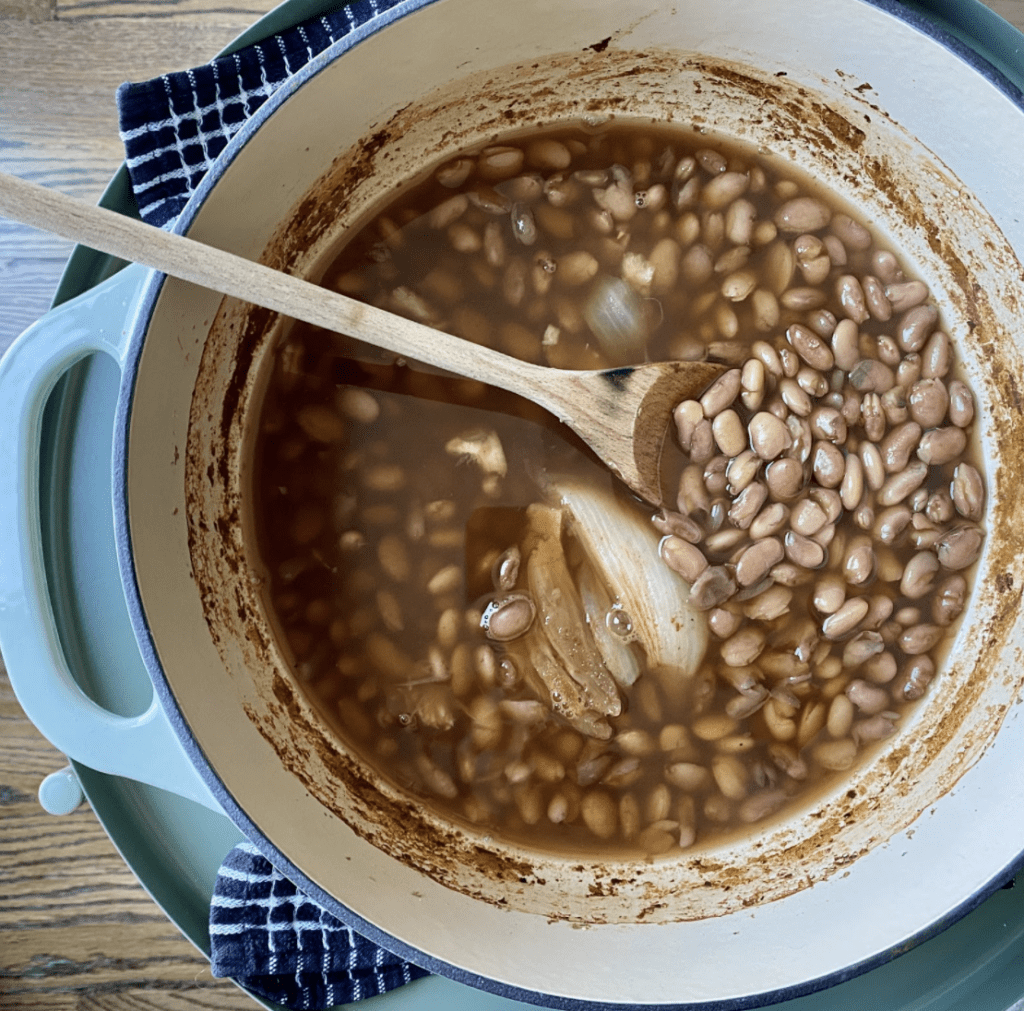
Photo by Jae Taurina Thomas.
My grandma swears by Estancia pinto beans from New Mexico. She travels to Albuquerque twice a year, partly to visit family we have there, and partly to buy beans. She says that a 20-pound sack lasts her about six months. After I moved out of California for college, my abuela began mailing me boxes with gallon-sized Ziploc bags stuffed with beans. Despite the large variety of prepackaged beans at local stores, my grandma always says: “There’s nothing like New Mexico beans.”
Although they take multiple hours and require a heedful cook, plain dried beans become the epitome of savory when cooked low and slow with plenty of aromatics — something canned beans (especially ones from Goya) will never amount to. In addition, they can be stored well in the fridge for around a week or in the freezer for up to two months, offsetting all the cooking hours. You can also easily make them vegetarian by ditching the pork and frying in canola or vegetable oil instead of lard or bacon fat. And you can stop after frying the beans whole or mash them up for traditional frijoles refritos. If you plan on making the latter, be sure to use a scratch-resistant pan, like a good cast iron skillet, so your cookware comes out unharmed after mashing.
As always, don’t panic if you find yourself running to the kitchen to add more water to a sizzling pot of frijoles — even the most seasoned Mexican home cooks have been forgetting about beans on the stove for years.
Refried Beans
Yield: 4 cups
Time: 4 ½ hours plus 10 minutes for frying
Ingredients
- 2 cups dried pinto beans* (Estancia Valley Pintos, if you can find them)
- ¼ large yellow onion, skin taken off, left in one piece
- 3-4 large cloves of garlic, sliced in half lengthwise
- 1 tsp. cumin
- 1 tsp. oregano (preferably Mexican)
- ½ tsp. New Mexico red chile powder or other red chile powder
- 1 ½ tbs. kosher salt
- ¼ pound salt pork or thick-cut bacon (optional)
- 2 tbs. bacon grease, lard or vegetable oil for frying
- 2-3 tbs. Mexican queso fresco or other shredded cheese for topping (optional)
- 2-3 tbs. chopped onion and cilantro for topping (optional)
*If you don’t have Estancia beans where you live, or don’t want to order them, opt for loose bulk pinto beans instead of bagged ones, if possible. Many Latino supermarkets have bins with bulk pintos.
Photo by Jae Taurina Thomas.
Slow Cooker Preparation
Step 1
Sort beans to remove any broken bits or rocks. In a colander, rinse beans under cold water.
Add sorted beans and cover with 6 cups cold water. Remove any broken bean pieces or skin that floats to the surface.
Step 2
Add onion, garlic, cumin, oregano, chile powder, and pork, if using, to the slow cooker. Stir until spices are evenly distributed. Cook beans for 2 hours and 30 minutes on high heat, checking periodically to make sure all the water hasn’t evaporated. Add more water if needed. Season with salt, cover and cook for an additional 2 hours.
Step 3
Discard any large pieces of onion and pork, if you used it, that may remain in the pot. Do not discard the cooking liquid.
Step 4
Heat a large cast iron skillet over medium-high heat for 3-4 minutes until hot. Add bacon grease, lard or oil, letting heat up very briefly, about 30 seconds. Add in beans and stir immediately, letting the outsides begin to blister, about 4-5 minutes.
Step 5
Lower heat to low. Pour in one cup of the reserved bean cooking liquid, and using a masher or a fork, begin to break down the beans until no whole beans remain and the mixture forms a thick paste. If the mixture is loose, cook it down for a few minutes until it starts to thicken. If the sides begin to dry up, add in more cooking liquid, a few tablespoons at a time. Top with queso fresco, onion and cilantro and serve alongside Spanish rice for the perfect duo of Mexican side dishes.
Stovetop Preparation
Step 1
Soak beans in cold water for two hours. Do not soak longer than 2 hours, as this may cause beans to split in half. Drain.
Step 2
Add beans to a large pot or dutch oven and cover with 12 cups of water. Remove any broken bits or skin that float to the top. Add onion, garlic, cumin, oregano, chile powder, and pork, if using, to pot. Stir to combine.
Step 3
Bring mixture to a boil over medium-high heat. This will take about 10 minutes. Once the liquid has come to a boil, place the lid on the pot, tilted, so air can still escape. Turn heat down to low. Cook beans for 1 hours and 30 minutes. Add salt, then cook for an additional hour. When fully cooked, beans should be tender but not mushy.
Step 4
Discard any large pieces of onion and pork, if you used it, that may remain in the pot once beans are done. Do not discard the cooking liquid.
Step 5
Heat a large cast iron skillet over medium-high heat for 3-4 minutes until hot. Add bacon grease, lard or oil, letting heat up very briefly, about 30 seconds. Add in beans and stir immediately, letting the outsides begin to blister, about 4-5 minutes.
Step 6
Lower heat to low. Pour in one cup of the reserved bean cooking liquid, and using a masher or a fork, begin to break down the beans until no whole beans remain and the mixture forms a thick paste. If the mixture is loose, cook it down for a few minutes until it starts to thicken. If the sides begin to dry up, add in more cooking liquid, a few tablespoons at a time. Top with queso fresco, onion and cilantro and serve alongside Spanish rice for the perfect duo of Mexican side dishes.
Arguably the best part of any Mexican meal is the heap of Spanish rice, alongside a mound of cheesy, refried beans. This orange-hued aromatic rice is known in northern Mexico (and by Mexican American families, affectionately) as arroz or arroz rojo.
For Mexican Americans, arroz is perhaps the most beloved side dish. The simple ingredients make it accessible and easy to batch-cook once you learn the process. Arroz brings to mind large family gatherings with mounds of rice, beans and carne asada in huge aluminum trays, ready for serving. As a child who grew up in The Valley of Southern California, I ate it with nearly every meal. For dinners, arroz con frijoles, or rice and beans, were a given.
This quintessential Mexican side dish, as many Mexican dishes, is a product of Spanish colonization. Not native to Mexico, rice as a crop was introduced as early as the 1500s. Mari-Jose Amerlinck — a professor of Regional Culture at the University of Guadalajara — detailed the history and importance of rice to Mexico in Rice and Beans: A Unique Dish in a Hundred Places. Rice originally came to Mexico from Asia — first by way of Arabic civilizations (which also influenced Mexican foods like escabeche and al pastor) and later through Caribbean islands and Spanish trading networks, according to Amerlinck. Additionally, influence from enslaved Black people and Moorish immigrants in Mexico, who were already accustomed to rice at the time of its introduction to the country, should be taken into account in the creation of the dish we now call Spanish rice, Amerlinck wrote.
Little is known on the particulars of how rice became such an important part of the Mexican diet. What is known, however, is that the tomato and onion spiced variation is actually part of a regional Mexican cuisine. Amerlink says that many Mexican culinary traditions — especially as they pertain to rice — have drawn their influence from local, popular and regional roots which have gone through a process of gentrification over the centuries. Amerlinck suggests that Spanish rice has evolved to its current form due to a search for certain dishes to gain more popular global acclaim. The well-loved orange iteration of arroz is found mostly in Northern Mexico and the Southwestern United States. Arroz blanco, or white rice, is more common in Southern Mexico.
Much of my family immigrated from Guadalajara — a habitat of the typical arroz rojo — and settled in parts of New Mexico and Southern California some generations ago. Learning the dish is something of a family tradition, passed down by the women in my family. And I might be biased, but no one makes it better than my grandmother.
My abuela is the designated rice maker for all of our family functions. No one can quite match the perfect fall-apart texture of her rice. The grains never stick together, as though each one was carefully coated in tomato sauce and cooked individually. Part of the flawless texture has to do with the pan she cooks it in — a shallow ceramic pot, only about an inch deep. But of course, the pan alone is not the golden ticket to mastering arroz rojo. Watching my grandmother make it is like watching a master seamstress sew a hem. She doesn’t measure. She doesn’t set a timer. She browns rice, onions, and garlic, and knows exactly the moment when cooked rice goes from underdone to perfect with a precision that may only be bestowed upon Latina grandmothers.
Over the phone, my abuela recounted her first experience cooking arroz. One day, when she was still a child, her grandmother asked her to watch over the pot, imploring her not to let the grains burn. “So there I am, ten years old, stirring the rice. And it started to look real pretty,” she said. “I saw it changing colors from white to golden, and I said ‘I gotta learn how to make this stuff.’”
When I moved from Southern California to New York for college, I called my mom and my grandma — almost on a weekly basis — from my tiny dorm kitchen to ask them how to make arroz. I remember the string of non-specific instructions; their explanations on how to make it were practically useless. The recipe lived in their heads and in their bodies, they just knew how to do it.
“Just brown the onions, garlic and rice until they look done,” my grandmother would say, “then just add the tomato sauce, water and bouillon. Put the lid on and it’ll be done, oh, in maybe 20 minutes or so.” But without fail, nearly every time, I turned the bottom of my pot into an inedible, blackened rice cracker. Even when I followed the directions exactly, it was impossible to recreate my grandma’s fluffy marigold-hued side dish.
Fast-forward some five years after those panicked weeknight phone calls over a burnt pot of arroz, and I have finally mastered the recipe. My rice now turns out as fluffy and vibrant as pots my grandma has cooked for me before. The grains no longer stick together in a tomato-y clump, but fall apart easily, flavored with all of the Mexican necessities — onions, garlic and tomatoes.
I tested the recipe that was handed down to me for over four years, and I found that using a medium to long grain rice yields the best results. Browning the rice properly in the beginning is the key to that fall-apart texture — it will ensure that the grains don’t stick together. It does take time and practice to get the water, heat, and timing all perfectly in balance, so first time arroz makers, don’t be afraid to stir the rice at around the 15 minute mark to ensure it does not burn. Of course, don’t worry if the bottom gets a little bit crispy the first few times. After a couple of tries, you just might start to feel the recipe in your head and body the way the women in my family have for generations.
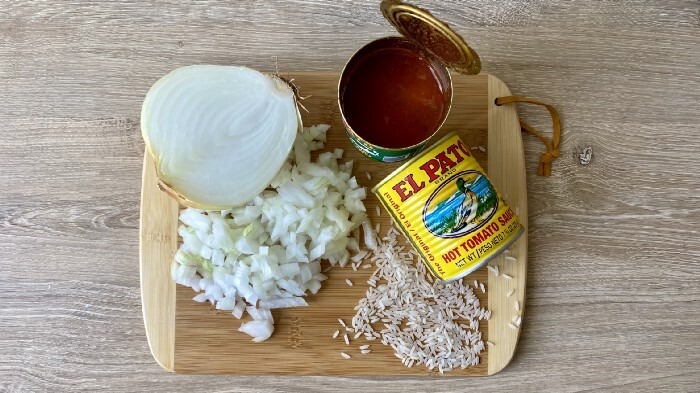
Photo by Jae Thomas.
Ingredients
- 2 tbsp. Canola oil or other cooking oil
- 2 cups white rice
- ½ medium onion, diced
- 2 tsp. garlic, minced
- ½ cup Pato Sauce or regular tomato sauce
- 2 ¼ cups water*
- 1 cube Caldo de Pollo (chicken soup) bouillon* (or the equivalent chicken bouillon powder)
*You can also use broth in place of the water and chicken bouillon cube. Use 2 ¼ cups of chicken or vegetable broth with salt and garlic powder to taste, about 2 tsp. of each.
Preparation
Step 1
Heat oil in a large pot over medium-high heat for about 1 minute. Once oil is very hot and shimmering slightly, pour in rice, stirring occasionally until grains begin to turn golden brown, about 4-5 minutes.
Step 2
Add in onions, stirring occasionally, until they just begin to turn translucent, 1-2 minutes. Add garlic, stirring to combine with onions and rice. Let cook for about 30 seconds until the garlic begins to turn golden brown.
Step 3
Turn heat down to medium-low. Add in tomato sauce of choice, mixing to coat the rice evenly. Cook tomato sauce down for one minute. Pour in water, immediately stirring to break up any clumps of rice. Break up one chicken bouillon cube with your fingers and stir into the rice until it is mostly dissolved.
Step 4
Bring mixture to boil, stirring once again to get rid of any clumps of rice. This will ensure rice does not stick to the bottom of the pan. Turn heat down to low. Cover. Cook with the lid on for 20-23 minutes, or until rice is soft and fluffy and the grains easily fall apart.
I have a horrible habit of making impulse purchases. And quarantine has only strengthened my ability to convince myself that I should buy something I absolutely do not need, and yet, must have. On my latest trek to CVS, I found my latest impulse buy: microneedle patches.
In the absence of fillers and elective dermatology visits, microneedle patch manufacturers claim to create a filler-like effect using tiny needles to deliver hyaluronic acid, a highly-moisturizing ingredient, to the skin. The needles create tiny ruptures in the outer layer of the face, triggering a regenerating effect. As a result, the skin becomes more susceptible to nourishing ingredients such as hyaluronic acid.
For just $4.99, I could not resist the urge to test the patches out on my massive forehead wrinkle in an at-home science experiment. (The patch’s suggested use included under eye areas and laugh lines, but I was not about to put microneedles near my eyes.)
I washed my face with a gentler cleanser than I normally use because dermatologists suggest avoiding harsh products in preparation for the treatment. For example, experts advise that clients cut retinol products from their routine for 48 hours before a professional microneedling procedure.
After patting my skin dry, I applied the sharp side of the patch to my forehead, as well as my right laugh line (my left one is more shallow and I only had one patch left.) The directions call for the patch to be kept on for three hours and be pressed into the skin every few minutes to increase effectiveness. The application of the patch did not hurt, but did feel like the prongs of a tiny plastic doll brush pressed into my skin.
It was harder than I expected to keep the patches on for three hours. About 30 minutes in, the patch on my laugh line started itching profusely, and did not stop until I took it off. The laugh line patch also made it pretty difficult to eat or drink anything, putting a wrench in my plans to have a cold one on my couch.
But the results made it worth it. I noticed an immediate difference after removing the patches. My right laugh line looked a lot closer in depth to my left, and my forehead wrinkle was less pronounced. While the effects somewhat subsided the next morning, I still could see a noticeable difference.

Photos of my face before (left) using microneedle patches and immediately after removing them (right).
For people who are unsure about professional-grade microneedling — be it because of its expense, a fear of needles, or skin sensitivity issues — microneedle patches can be a great introduction to the procedure. Beyond the mild itching I experienced on my laugh line (likely because of the patch’s location) I had no pain, swelling, or other negative side effects. However, microneedling can cause bleeding, bruising, infection, and peeling; and may not be safe for people who have had recent radiation treatments, or suffer from psoriasis or eczema, Healthline reports. Excessive microneedling can also lead to more permanent rupturing of the skin. A dermatologist told Elle Magazine that overdoing microneedling can cause the skin to look like plastic.
With one use, the patches appeared to successfully fight signs of aging on my face. What remains to be seen is whether incorporating them into my largely nonexistent skincare routine will reduce further cleaving of my freakishly large forehead wrinkle.
Editor’s note: Do not attempt to alter your skincare regimen or use skincare products without consulting a physician.
All products mentioned in this story were purchased by or gifted to the author. No brands paid for or sponsored this article.
Dearest friend,
How’s it going? I’ve missed you! Yesterday I got up, went for a walk, checked the news, finished work, watched TV, baked brownies, doomscrolled on Twitter, went for another walk, donated to mutual aid funds, took a bath, and went to bed. I did roughly the same thing the day before that. And last week. And last month. In some personal news…there isn’t much!
XOXO
That’s a pretty bleak letter. But as we endure the repetitiveness of a physically distanced life, handwritten correspondence has made a comeback. Unlike a series of lengthy text messages or a glitchy video chat, a thoughtful letter offers the uninterrupted opportunity to wax poetic. Long letters convey an enduring love, one that can outlast distance, isolation, and intangible social platforms. Similarly, a letter in the middle of a pandemic should serve as a cheerful escape from our loneliness and confinement, not a melancholic recap of the state of the world. So the next time you put pen to paper, rather than summarizing your attempt to make the TikTok coffee, consider filling the daunting space between Dear and Love with some of the following suggestions.
Quizzes
School’s out for summer, but who would object to discovering which PowerPuff Girl they are based on their favorite pasta shape? As part of the generation that grew up on Tiger Beat Magazine and BuzzFeed personality quizzes, I am consistently thrilled to write and receive handcrafted multiple choice assessments that don’t result in bad grades. And there are few greater joys than getting an indignant text along the lines of “I am not a Buttercup! Standardized testing is a scam!!”

Part of a “Which Popular Vampire Are You?” quiz I mailed to a friend in April 2020.
Poetry
Audre Lorde once wrote, “Of all the art forms, poetry is the most economical.” Although letter writing is a thoughtful way to share the minutiae of your life, it can be time consuming. But you don’t always have to string all the words together yourself. For centuries, poets have been saying all the things you and I struggle to articulate. Consider subscribing to Pome by Matthew Ogle. Each day, Ogle will send a short poem or succinct snippet of poetry to your inbox. Simply transcribe that daily email into your letter and introduce your friends to unfamiliar works of art.
Recommendations
I will be the first to admit I’m awful at accepting advice and recommendations. “Oh, you must watch this movie!” and “I can’t believe you’ve never heard of this band!” can sound like condescending lectures in taste. But unlike a passing remark during a night out, a written list of films, songs, or books by someone who knows you feels personalized, making it a thoughtful sentiment.
Art
The most important part of letter writing is knowing your audience. If you have younger pen pals just learning how to read, try your hand at illustration. Add a painting of flowers you saw last week or a drawing of your pets. Show, don’t tell! And even if you’re writing to someone your age, don’t assume doodling in the margins will be frowned upon.

These pet sketches won’t get me into the Met, but my nieces are nice enough to appreciate the effort.
Magazine clippings
Reduce, reuse, recycle! Once you read your monthly magazine subscription, do you toss it out? Or stack it in a closet to gather dust? I don’t know if teenagers still make wall collages from glossy magazine cuttings of Hollywood heartthrobs, but the illustrations and photographs in my favorite subscriptions are too good not to share. The how-to guides, recipes, and crossword puzzles sandwiched inside People, Texas Monthly, and The New Yorker just beg to be shared.
Stamps
Not everyone can afford ornate stationery and Instagram-worthy wax seal sets. The surest way to get a letter back is to provide some spare materials with the one you send. Browse the limited edition sheets from the United States Postal Service and simultaneously support one of the last public goods in this country. Your friends will thank you.