I’ll be honest: I was a shopaholic (no, seriously). When I lived in New York City, I would go into the Urban Outfitters’s sale section and scour for the best deals. I would do it when I was bored, needed a new scarf to get me through a chilly winter day, and even when I had breaks in between classes at NYU. Throughout the last nine months, I haven’t necessarily relied on online shopping to get me through the days, but it gave me and many other people something to look forward to in a period when not much was happening in our day to day lives. Almost every other day I would see a tweet like “what are we buying today” or “I’m going to shop because I’m sad.” Although there appears to be a social awakening in the U.S., we still clutch to the perils of what consumerism best provides us: instant gratification.
Financial experts warned consumers of comfort spending at the beginning of the pandemic. Ken Lin, the CEO of Credit Karma, told USA Today back in June that “stress spending gives a sense of control, a valuable feeling during an out-of-control experience like a pandemic.” Now that people are spending less and less time and money on entertainment and meals at restaurants, they have created more space in their budgets for comfort spending. The University of Chicago found that spending declined steeply for low and high earners alike at the beginning of the pandemic. While the lower class struggled and the higher class thrived financially, the middle class, living up to its name, found itself somewhere in the middle with some of its members struggling to find work and others continuing to fuel the U.S. economy like nothing changed.
In that middle, you’ll find two types of capitalistic fools: those who go out to stores to feel something and those who shop online to feel something. The only difference is the consumer’s level of comfort during a national pandemic. The American middle class has been conditioned to rely on the capitalistic system to fuel our lives and our happiness. They’re the main target of big corporations’ ads because they still remain America’s biggest financial demographic. As there’s been less to do and spend our money on, we continue to shop because that’s all we know. And now, shoppers can do that from the comfort of their home.
It doesn’t help that social media platforms are now evolving into online shopping centers. Instagram notably added a more elaborate shopping feature to the app in June of this year. Facebook Marketplace is cluttered with ads. This year, TikTok remained at the center for the latest trends.
I’ll never forget the Strawberry Dress trend. Thousands of people on Twitter and TikTok alike became obsessed with handmade Lirika Matoshi’s $490 Strawberry Dress in August of 2020. The ethereal, sparkly number allowed people to live out their fantasy of feeling fabulous — feeling like they had somewhere to go, feeling special, feeling magnificent, and feeling like they were a part of this majestic, lush planet when people spent most of their time indoors. The strawberry dress trend somewhat fed into or was in conversation with the cottagecore trend. The two aesthetics afforded a form of escapism that only money could buy — with frilly dresses and gorgeous bouquets. You could live out your whimsical fairytale with only a click of a button, while the country around you crumbled.
There’s no judgment here, I’m just as guilty. I’ve sought relief in purchasing video games, funky dresses, too many types of bath soaks, and even a new TV. Before the pandemic, I thought baths were gross, rarely played video games, and was firmly against having a TV in my bedroom. I’ve now created space to both entertain myself and stay relaxed.
Unfortunately, not everyone has the means to invest in their space or live out new fantasies. Now, people, especially younger consumers, are turning to interest-free lenders like Klarna and Afterpay to afford purchases from major retailers. I myself used PayPal’s new “Pay in 4” payment plan to purchase the fancy, famous moth dress from Fashion Brand Company and my new TV from Best Buy. There was a certain type of thrill in being able to find and purchase quality goods I typically would not purchase otherwise. When the items arrived, I felt a certain type of ecstasy, like I was living someone else’s life (it’s dumb, I know). But once I received a text message about my first payment going through, I got major anxiety.
Other consumers recognize the thrill of the chase — adding items to their online cart and then eventually abandoning them. This peculiar form of online browsing saves consumers from overspending and costs e-commerce brands billions. Bettina Makalintal reported on the cart abandonment phenomenon for Vice. For the story, Makalintal spoke with master cart abandoner Cole Huling, an artistic director for an entertainment company in Colorado. Huling divulged how her online browsing increased during the pandemic, explaining, “The beauty of fantasy shopping is imagining a different world than the one I’m currently living in,” adding, “that perfect travel pillow, that perfect travel dress — it’s a way of replacing the void left by canceled plans and endless uncertainty.”
American culture is so intertwined with material culture that we fantasize about things — how our lives will be easier, more luxurious, and beautiful if we can afford something. While the pandemic forced many to reconcile their values and needs, it has pushed us further into this consumerist cycle of browsing, purchasing, and receiving to the point where it’s become an accessible form of entertainment. We fill the time by browsing on the internet because we don’t know what to do with ourselves. We further this fantasy in our subconscious that something shiny and new means it’ll afford us something new in our lives. We can warp ourselves into thinking a purchase will allow us to feel something — it’s a rush, even if the rush is all the same. Lighting a new candle, trying out a new hobby, or sporting your new dress to go nowhere can fill this precarious, devious void that the pandemic continues to widen and darken. We con ourselves into believing we can create memories with purchases, and that sometimes we can make up for lost time with them too.
Pears are a great seasonal fruit that often get overlooked during this pumpkin and apple-worshipping time of year. But they carry warm, fall spices like cinnamon, nutmeg, and brown sugar just as well and caramelize perfectly while baking.
The dough for this tart is simple, with only five ingredients and a splash of cold water. It comes together in less than 20 minutes because it doesn’t require any kneading or extensive mixing. Overworking the dough will begin to soften and melt the butter, resulting in a dense crust. The butter should remain in small, pea-size pieces throughout the entire process. So you can literally do the bare minimum with this tart dough and it will come out of the oven buttery and flaky. Just don’t let the mouth-watering smell overtake you and make sure to let the tart rest before serving, as the cream cheese filling will need time to set. If you’d like to start prepping your Thanksgiving dessert ahead of time, the dough can be made up to two days in advance if kept chilled in the fridge.
Brown Sugar Pear Tart
Yield: 1 10” tart
Time: 2 hours, 15 minutes plus 1 hour for chilling and 1 hour for cooling
Ingredients
Tart Dough
- 1 cup all-purpose flour, plus more for work surface
- 1 tbsp. sugar
- ½ tsp. salt
- 6 tbsp. cold, unsalted butter, cut into small pieces
- 1 egg, beaten
- ¼ cup cold water
Cream Cheese Filling
- 16 oz. cream cheese, softened
- 1 cup sugar
- 1 tsp. ground cinnamon
- 1 tsp. ground nutmeg
- 1 tbsp. honey
- 1 tsp. vanilla extract
- 3 pears
- ½ cup brown sugar, plus more for sprinkling
Preparation
Tart Dough
Step 1
In a large bowl, combine flour, sugar, and salt. Add butter and use a pastry cutter (or two knives) to cut the cold butter into the flour mixture. When the butter is fully incorporated, the mixture should be crumbly and coarse. The remaining chunks of butter should be about the size of a small pea.
Step 2
Add the egg and the water and mix with a fork until the dough begins to come together. Using your hands, gently form the dough into a ball.
Step 3
Place the dough on a lightly floured work surface and form the dough into a flat disk. Wrap in plastic wrap and chill in the refrigerator for at least one hour, until the dough feels firm.
Cream Cheese Filling
Step 1
Place the cream cheese in a large bowl and add the sugar, cinnamon, nutmeg, honey, and vanilla extract. Mix together with a wooden spoon until all ingredients are incorporated into the cream cheese.
Step 2
Chop the pears into slices about ½-inch thick, discarding the cores. Transfer to a medium-sized bowl and toss with brown sugar until evenly coated.
Step 3
Preheat the oven to 350 degrees Fahrenheit. Remove the dough from the fridge and let stand at room temperature for at least 5 minutes, or until just soft enough to roll out. Unwrap the dough, place it on a lightly floured workspace and roll into a 12-inch circle.
Step 4
Spray a 10-inch metal tart pan with non-stick or grease with butter. Place the dough in the tart pan, gently pressing it into the bottom of the pan. Press the dough into the sides of the pan and fold over excess dough to make a crust.
Step 5
Spread cream cheese filling onto the dough. Top with pear slices, arranging the slices into concentric circles. Sprinkle the pear slices with one more pinch of brown sugar and then transfer the tart to the oven. Bake until the crust is golden brown and pears have caramelized, about 50 to 60 minutes. Remove from the oven and let rest at least one hour before serving so that the cream cheese filling has time to set.
This recipe is part of The Interlude’s Thanksgiving Week. Check out the other recipes here.
Mashed potatoes will be around every year, but this year needs a single dish that has it all, since you’ll most likely be doing the cooking yourself and won’t have the manpower (or the need) for a meal with a million different dishes. Inspired by the Spanish appetizer patatas bravas, this recipe has everything you could need for Thanksgiving: crispy bacon fat fried potatoes, Brussels sprouts, bacon bits, a tangy lemon aioli topping. Onions, garlic, paprika, cayenne and bay leaf bring a little bit of Spanish flair to the dish, while the potatoes and Brussels sprouts provide that quintessentially fall feeling.
Considering you’ll probably be using the oven for turkey, dessert, and stuffing, this tasty side dish comes together in just fifteen minutes on the stove, so you won’t have another thing waiting in line to be baked. It can easily be made vegetarian too — just ditch the bacon fat for some neutral oil and feel free to swap the bacon bits for some crisped-up soy chorizo, or just leave them out all together (If you want to go full vegan, opt for Vegenaise in the aioli instead of regular mayo.) The aioli can be made in just a few minutes since it uses mayo as a shortcut, and if you want to cut down even more Thanksgiving day cooking, make it the night before.
Pan-Fried Potatoes With Brussels Sprouts, Bacon, and Lemon Aioli
Yield: 4-5 servings
Time: 15-20 minutes
Ingredients
- 4-5 slices thick cut bacon, chopped
- 4-5 medium sized golden potatoes, chopped into 1 inch pieces
- 8 oz. Brussels sprouts, quartered
- ¼ yellow onion, finely chopped
- 2-3 cloves garlic, minced
- ½ tsp. smoked paprika
- ¼ tsp. dashes cayenne pepper
- 1 bay leaf
- Kosher salt and freshly ground black pepper, to taste
Aioli
- ¼ cup Kewpie or other mayo
- 2 tsp. lemon juice
- ½ tsp. lemon zest
- 1 clove garlic, minced
- Kosher salt and freshly ground black pepper, to taste
Preparation
Step 1
Line a plate with a paper towel. Cook the chopped bacon in a heavy-bottomed skillet over medium high heat until pieces are almost crispy. Remove bacon pieces and place onto the plate, reserving the fat. Strain out burnt bacon pieces from the fat using a fine meshed colander if necessary. Return 2 tbsp. fat to the skillet.
Step 2
Heat bacon fat over medium heat. Add in the potatoes, and allow them to sear until golden brown, stirring only occasionally. After about 5-6 minutes, add in the Brussels sprouts. Let the Brussels sprouts cook for about 5 minutes, or until most of them begin to brown on the surface.
Step 3
Add in onions and garlic, stirring frequently until onions begin to turn translucent, about two minutes. Add in the paprika, cayenne pepper, bay leaf, and a few pinches of black pepper, and stir to combine.
Step 4
Add chopped bacon pieces back into the skillet. Season with salt and pepper to taste. Remove bay leaf. Set mixture aside while making the aioli.
Step 5
To make the aioli, combine mayo with lemon juice, zest, and garlic. Stir to combine and season with salt and pepper to taste. Drizzle potatoes and Brussels sprouts with the aioli to serve.
This recipe is part of The Interlude’s Thanksgiving Week. Check out the other recipes here.
Even if you’re not roasting a whole turkey for Thanksgiving this year, you still deserve to have some great stuffing! This version is perfect for a smaller holiday dinner as it can be made without turkey. Soaking the stuffing in chicken stock and adding an extra splash before it goes in the oven gives it the same moisture that the turkey’s roasting juices would, so you won’t miss out on any flavor.
While the stuffing bakes and absorbs the stock, the homemade bread crumbs transform from crunchy croutons to a soft breading that holds together the sausage, pecans, and cranberries. If you don’t have time to make the bread crumbs yourself, you can opt for a store-bought version. Pepperidge Farm Classic Stuffing comes already seasoned and are the perfect sized chunks for this recipe. If you use Panko or a finer bread crumb, the chicken stock won’t be fully absorbed and the stuffing will be too wet. And if you’re vegetarian, don’t fret: the saffron will carry this dish. Just be sure to swap the sausage with your favorite soyrizo and make the stuffing with vegetable stock.
Saffron Sausage and Cranberry Stuffing
Yield: Serves 2-4 people
Time: 1 ½ hours
Ingredients
Bread Crumbs
- 1 tbsp. olive oil
- ½ small loaf French baguette, preferably stale
- 1 tsp. dried oregano
- 1 tsp. dried rosemary
- 1 tsp. ground sage
Stuffing
- 3 tbsp. olive oil
- ⅔ cup (about 1 small) white onion, finely chopped
- ⅔ cup (about 2 ribs) celery, thinly sliced
- 1 lb. ground pork
- 1 tsp. salt
- ½ tsp. paprika
- ½ tsp. dried oregano
- ½ tsp. ground cumin
- ½ tsp. ground black pepper
- ½ tsp. saffron threads
- ½ tsp. chili powder
- ¼ cup fresh parsley, finely chopped
- 3 bay leaves
- 1 cup pecans, coarsely chopped
- 1 cup dried cranberries
- 1 cup bread crumbs
- 1 ¼ cup chicken stock
Preparation
Step 1
Make the breadcrumbs: Preheat the oven to 400 degrees Fahrenheit. Slice the baguette. Working over a medium-sized bowl, tear the slices into small chunks. Drizzle with olive oil and add the oregano, rosemary, and sage. Toss with hands until bread chunks are evenly coated and seasoned.
Step 2
Line a sheet pan with tinfoil. Spread the bread chunks out onto the pan and transfer to the oven. Toast until golden brown and hard to the touch, about 18 minutes. Remove from the oven and let cool.
Step 3
Make the sausage: Preheat the oven to 350 degrees Fahrenheit. Heat olive oil in a pan over medium heat. Combine salt, paprika, oregano, cumin, black pepper, saffron, and chili powder together in a small bowl and set aside. Add onion and celery to the pan and cook until softened, about 3-4 minutes.
Step 4
Add the ground pork to the pan with the bowl of seasoning. Add the chopped parsley and bay leaves. Stir with a wooden spoon, breaking the sausage into chunks as you mix in the seasoning. Cook until browned, about 13-15 minutes.
Step 5
Spray a small baking dish with non-stick, or lightly grease it with butter and set aside. Transfer sausage to a large bowl. Add the pecans, cranberries, bread crumbs, and 1 cup of the chicken stock. Mix well until all ingredients are moistened. Transfer the stuffing mixture into the baking dish and add the remaining ¼ cup chicken stock. Cover with tinfoil and bake until steaming, about 30 minutes. Remove foil and bake uncovered until slightly crispy on top, about 10 more minutes.
Make ahead: The stuffing can be assembled ahead of time and refrigerated until ready to bake in the oven. Be sure to let the stuffing come to room temperature before adding chicken stock and transferring to the oven.
This recipe is part of The Interlude’s Thanksgiving Week. Check out the other recipes here.
Even in a normal year, making a whole turkey for Thanksgiving isn’t fun. It’s huge, takes forever to roast, and is almost always inconsistently cooked. The breast will cook faster than the thigh and leg meat, resulting in a dried out turkey breast that basically needs to be covered in gravy to be edible. And whoever came up with the idea of a wet brine? Truly ridiculous. No offense to whoever does the Thanksgiving cooking at your house, but wet-brining and roasting a whole bird just isn’t it. Baking turkey in pieces or just cooking the breasts will ensure more even cooking, and dry brining actually yields a tastier, more tender result.
This turkey breast recipe is perfect for a smaller group (because you should only be having a small gathering this year). It’s dry brined for 24 hours, and needs to sit out on the counter for an hour before baking. Once cooked to an internal temperature of 150 degrees, it also needs to rest on the counter at room temperature for 45 minutes to an hour after cooking, so plan accordingly. The resting time will allow the turkey to come up around 10 additional degrees in temperature, and will lock in all the tasty juices. This may seem like a lot of time for a single turkey breast, but the passive work you put in here will result in a meal that is worth the wait. After it’s rested, this turkey breast is tender, juicy, and deeply flavorful from the dry brine, and makes fantastic sandwiches if you happen to have leftovers. The recipe can be riffed on with different spices and flavor combinations, but just be sure to keep the salt and sugar measurements the same.
Savory Dry Brined Turkey Breast
Yield: 4-5 servings
Time: 45-55 minutes cooking, plus 24 hours to brine and 2 hours total resting time
Ingredients
- 1 turkey breast, around 4-5 lbs.
- 2 ½ tbsp. kosher salt
- ½ tsp. smoked paprika
- ½ tsp. cayenne
- 1 tsp. dried rosemary
- ½ tsp. onion powder
- ½ tsp. garlic powder
- ½ tsp. cumin
- 3 tsp. brown sugar
- ½ stick unsalted butter
Preparation
Step 1
Set a wire rack on top of a baking sheet. Pat the turkey breast dry with a paper towel and place on the rack.
Step 2
Mix together the salt, sugar and spices in a small bowl. Rub the spice mix all over the turkey breast, top and bottom until fully coated. Gently pull some of the skin away from the meat (2-3 inches of it, don’t pull all the way off) and rub the spice mix on the meat under the loosened skin.
Step 3
Once the turkey has been covered in the dry brine mixture, put it in the fridge, uncovered. Let the turkey sit uncovered in the fridge for at least 24 hours. When ready to cook, let stand on the counter at room temp for 1 hour, and preheat the oven to 425 degrees Fahrenheit while the turkey rests. Remove the turkey from the rack to discard any liquid that has accumulated in the baking sheet. Dry the rack and baking sheet, and line the baking sheet with heavy-duty foil.
Step 4
Cook turkey for 20 minutes at 425 degrees Fahrenheit. Pull turkey out and baste with butter, top and bottom. Return turkey to the oven, and cook for an additional 30-35 minutes, basting with butter every 10 minutes. The turkey is done when an instant read thermometer reaches 150 degrees when inserted into the thickest part of the breast. If you don’t have a meat thermometer, feel free to flip the turkey over and cut into the bottom to check for done-ness.
Step 6
Turn the broiler on to medium (or just on if you can’t adjust the setting). Let the turkey broil for 1-2 minutes to crisp up the skin. Watch it carefully while broiling, so as not to burn it.
Step 5
Allow the turkey to rest on the counter for 45 minutes before slicing.
This recipe is part of The Interlude’s Thanksgiving Week. Check out the other recipes here.
As sugar skulls, papel picado, and other Día de Muertos decorations began to pop up in my neighborhood over the last few weeks, I started thinking about my relationship to the holiday and what I would do to celebrate this year. Día de Muertos is a two-day Latin American feast that honors loved ones who have passed away. It has a rich food history, with many people creating ofrendas, or altars, full of food that serves as an invitation for the dead to visit the realm of the living and enjoy tasty treats.
My family never truly celebrated Día de Muertos, aside from putting up a few photos of deceased family members and decorating them with cempasúchil (marigold) flowers. So, while I thought of writing about the traditional Día de Muertos food, pan de muerto, at first, I felt wrong laying claim to a dish that so many Mexican home cooks and bakers have made their whole lives, especially since my family doesn’t have a recipe for it (at least, not anymore).
But still, I wanted to commemorate the holiday to honor my great-grandparents, who celebrated the holiday every year when they were alive. My abuelo’s parents (great-grandma Rafaela and great-grandpa Alfonso) were both immigrants from Guadalajara, and my closest related line back to Mexico where so much of our family culture comes from. While I was talking to my mom about what Grandma Faela and Grandpa Fonso used to cook, I remembered a family conversation some years ago about croquetas de papa — or potato croquettes — that my great-grandmother used to make for holidays.
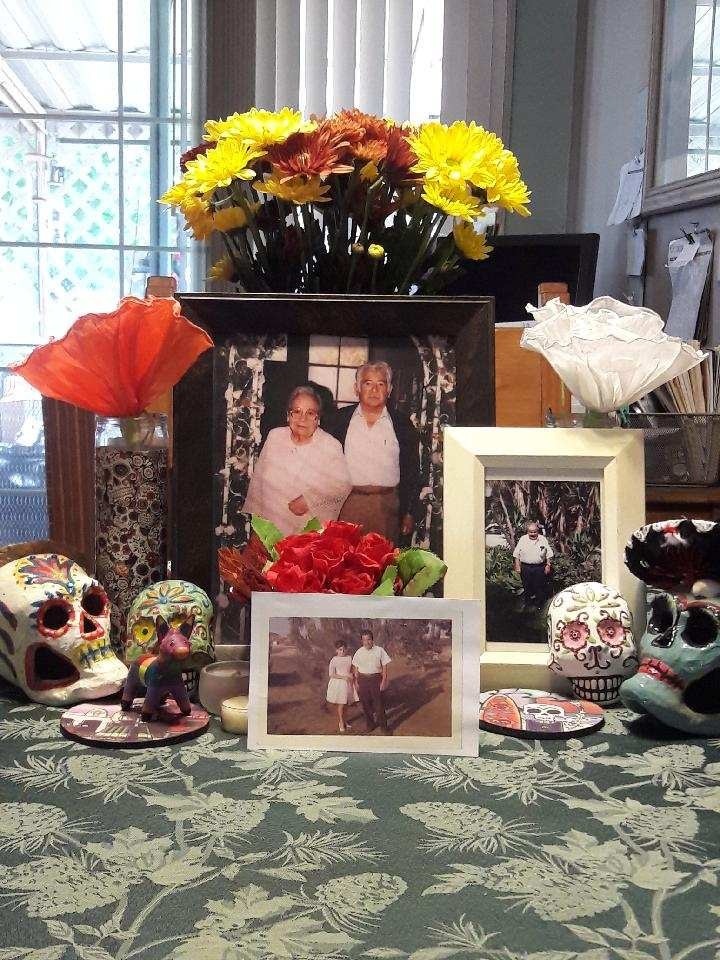
Photo of family Día de Muertos altar, sent by the author’s grandmother.
“She used to make them for Thanksgiving,” Mama told me. “But no one knows how to make them.” My abuela said that Mama had been asking her to make croquetas de papa for Thanksgiving for years, but no one had attempted to cook them since great-grandma Rafaela died and took the recipe with her. So, I decided I wanted to bring it back.
The only ingredients anyone in my family remembers from these croquetas are potatoes and corn flakes. The corn flakes threw me off. How did my great grandmother, an immigrant from Guadalajara, end up with a croquette recipe that was covered in corn flakes?
I know what you’re thinking: Croquetas are Spanish, right? Or French? That’s what I thought too, but a lot of internet research and Googling in (very broken) Spanish has shown me that it’s more complicated than that.
Let me bring you along for the ride down my croqueta search engine rabbit hole.
At first glance on English Google (we’ll get into Spanish Google later — be warned), croquettes originated in France, first popping up around 1691. Then, they eventually made their way to the Netherlands, where they’re called krokets, and Spain, where they’re called croquetas.
We all know the story of Spain’s colonization of Mexico by now (I’ve said it before and I’ll say it again — almost every modern Mexican food was impacted by colonization somehow.) At first, I wasn’t even sure if this was a Mexican dish that my great grandmother had been preparing all those years, since English Google made virtually no mention of Mexican croquetas. But the little potato fritters ended up in Mexico somehow, because when I started searching in Spanish, I found a YouTube video and an article detailing the recipe for tortitas de papa con amaranto, or potato fritters with amaranth: a native Mexican grain. A Spanish Google search showed that tortita is a synonym for croqueta, so I knew I was on the right track.
Amaranth is nutty and crunchy, and often popped to use as a crispy element in recipes. Connecting this Mexican recipe for tortitas de papa con amaranto to my great-grandmother’s croquetas was a little bit tricky because of the difference in ingredients. The methods for both seemed to be the same, so my guess is that she knew how to make potato fritters with amaranth, but couldn’t find popped amaranth in San Fernando to make them. Her substitution? Crushed corn flakes.
Once I figured out that Grandma Faela’s croquetas were a product of colonization, immigration, and ingredient translation, I got to work recreating and reimagining the recipe. My grandparents said that Grandma Faela’s croquetas were only potatoes and corn flakes, and that they were baked. I wanted to add more Mexican flavor to them, bring in a little heat from chiles, and some depth from chorizo. After baking them once, I thought that they could also use a more noticeable crunch to the exterior, so I opted to fry them instead, like taquitos.
My final recipe is obviously different from my great grandmother’s, but it still holds the essence of her Thanksgiving croquetas. I think this little exercise is a testament to what Día de Muertos is all about — bringing the living and the dead together. By taking the building blocks of my Grandma Faela’s croquetas and adding to them, I’m able to simultaneously keep her legacy alive and also continue to engage with her, even though she’s passed on from the physical world.
Croquetas de papa (Potato croquettes)
Yield: about 20 small croquetas
Time: 1 hour
Ingredients
- 2 ½ lbs. golden or russet potatoes, peeled and cut into one inch chunks.
- 1 tbsp. butter
- 1 tbsp. half and half
- ½ tbsp. salt, plus more to taste
- Black pepper, to taste
- ½ tsp. chile powder
- ⅔ cup cheese of choice, shredded or crumbled (queso fresco, cotija, or cheddar would all work well), optional
- ⅔ cup Mexican chorizo, cooked, optional
- 2 eggs
- ½ tsp. garlic powder to taste
- 4-5 tbsp. flour
- 4 cups corn flakes, crushed to a coarse powder
- 1 cup canola or vegetable oil, for frying
Preparation
Step 1
In a large pot, cover cut potatoes in cold water. Add ½ tbsp. salt to water. Allow water to come to a boil over medium-high heat. Once water is boiling, cook potatoes for 12-15 minutes until soft. Drain and return potatoes to the pot to cool.
Step 2
Once potatoes have cooled, mash them with a fork or masher until smooth. Add butter and 1 tbsp. half and half, stirring to combine.
Step 3
Add 1 egg yolk to the potato mixture, reserving the egg white. The mixture should be smooth, but thick and somewhat sticky. Season potato mixture with 2 tsp. salt (or more, if desired), ½ tsp. red chile powder, and black pepper to taste. Add in shredded cheese and/or cooked chorizo, if using.
Step 4
Line a baking sheet with parchment paper. Take 1 ½ heaping tablespoons of the potato mixture and roll into 2×1 inch football-shaped croquetas, placing onto the baking sheet. Create croquettes until all the potato mixture has been used. Chill in the freezer for 10 minutes.
Step 5
While the croquetas are chilling, place crushed corn flakes into a medium bowl. Season with garlic powder and salt. Whisk remaining egg with reserved egg white in another medium bowl. Place flour on a large plate.
Step 6
Working one at a time, dip croquetas into flour dredge, turning to coat lightly. Dip into egg mixture, then dredge in corn flake mixture, turning to coat. Transfer to a large plate.
Step 7
In a medium pan, heat oil to 350 degrees Fahrenheit. Working in batches of three, fry each croqueta for 15 seconds on each side (four sides) until the outside is golden brown and crisp all the way around. Place on a wire rack over a parchment lined baking sheet to cool. Serve with creamy avocado salsa and Mexican crema, if desired.
As autumn enters this dreadful year of COVID-19, we’re all mourning the fun that could have been. From fall festivals to costume parties, most seasonal activities have been postponed to some other year when the global pandemic is over. But staying in and avoiding crowds doesn’t have to be the end of all the fall fun. Enter: a great DIY cocktail, and cozying up at home suddenly doesn’t seem like such a dismal option.
These four autumnal recipes are simple enough to try even if you’ve never played bartender before, so there’s really no excuse not to treat yourself. Try the classic, no-effort Drunken Pumpkin when you feel like watching every Halloween movie on Netflix or warm up a Fireside Cider to disappear under a giant blanket with your favorite book. Whatever cozy vibes you choose, these drinks will make the perfect pairing.
The Drunken Pumpkin
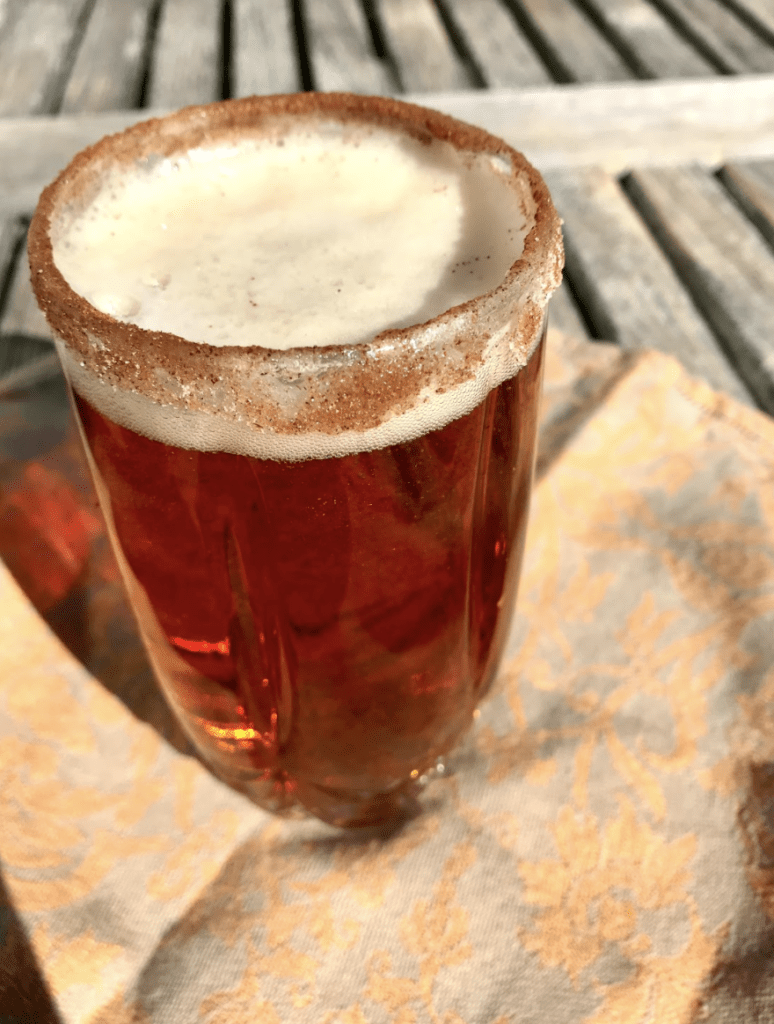
Photo by Carmen Russo.
Remember when bars were a thing and you could order a beer and a shot special? This simple pumpkin and vanilla combo will make you question why you ever wanted Miller High Life and whiskey, plus it will elevate your favorite seasonal pumpkin brew to a whole new level of creamy goodness. This drink comes together in the 30 seconds it takes to pour a beer into a glass, but the cinnamon sugar rim makes it look (and taste!) extra special.
Ingredients
- 1 pint pumpkin beer
- 2 oz. vanilla vodka
- Cinnamon sugar
Preparation
Wet the rim of a pint glass with water and then roll in cinnamon sugar. Tilt the glass at an angle and pour in the beer. To avoid a glass full of foam, keep the pour slow and steady until the glass is just about full. Add the vanilla vodka and then top with any remaining beer.
Cocoa Toasty

Photo by Carmen Russo.
If you haven’t tried peanut butter whiskey yet, this is the way to do it. The subtle peanut butter flavor makes the whiskey taste smoother and richer, and it melts right into the hot chocolate. This warm drink will satisfy that Halloween craving for a party-size bag of individually wrapped Reese’s peanut butter cups.
Ingredients
- 1 packet hot cocoa mix
- 2 oz. peanut butter whiskey
- 3 jumbo marshmallows
Preparation
Make the hot cocoa according to package instructions. While heating the water or milk for your cocoa, lightly toast marshmallows over the stove or with a kitchen lighter. Pour cocoa into a mug and add peanut butter whiskey. Top with toasted marshmallows.
Fireside Cider

Photo by Carmen Russo.
Who needs a fireplace when you can have a mulled cider instead? The warmth of cinnamon, nutmeg, cloves, and allspice in the apple cider complement the robust notes of molasses, brown sugar, and vanilla in black rum. The pairing will warm you up from the inside out even on the chilliest fall evening.
Tip: For deeper flavors in the cider, warm ahead of time and let sit before reheating.
Ingredients
- 2 ½ cups apple cider
- 3 cinnamon sticks
- 2 whole nutmegs
- 1 tsp. whole cloves
- 1 tsp. whole allspice
- 1 tbsp. vanilla extract
- 2 oz. black spiced rum
Preparation
Wrap cinnamon sticks, nutmegs, cloves, and allspice in a piece of cheesecloth and tie with kitchen twine. Pour cider into a pot, add the spice packet, and warm over medium heat until steaming, about 8-10 minutes. Stir in vanilla extract. Pour warm cider into a mug and add black spiced rum.
Spiced Pear and Vanilla Bean Float

Photo by Carmen Russo.
This decadent dessert drink is a deconstructed version of an actual spiced pear dessert, so you know it’s going to be good. The first time I made pears baked in puff pastry, I topped it with vanilla ice cream and washed it all down with a neat glass of nice bourbon. The pairing was so perfect that I couldn’t resist experimenting with a cocktail recipe that gave me all the indulgence without the baking. The final product involves one make-ahead step, but it’s totally worth it. The spiced pear simple syrup only takes a few minutes, but it has to cool completely before using it in the cocktail.
Tip: Don’t remove the pear and cinnamon from the syrup until you’re ready to use it. Allowing the aromatics to sit in the syrup as it cools will deepen the flavor.
Ingredients
- 1 cup water
- 1 cup brown sugar
- 1 large pear, cut into small chunks
- 3 cinnamon sticks
- 3 oz. Prosecco
- 2 scoops vanilla bean ice cream
- 2 oz. bourbon
- 1 ½ tbsp. spiced pear simple syrup
- Freshly grated nutmeg
Step 1
Combine water, sugar, pear, and cinnamon in a small saucepan. Bring to a boil and stir until sugar is dissolved. Let cool completely. Use a slotted spoon to remove the pear and cinnamon. (But don’t get rid of the pear chunks — they taste like fruit candy!)
Step 2
Pour 2 oz. of Prosecco into a tall glass. Add two scoops of ice cream, then add bourbon and the spiced pear simple syrup. Top with remaining Prosecco and garnish with nutmeg.
As soon as the first chilly day rolls around each year, my internal soup mode switches on. I love soup. I’ll scream it from the rooftops. And once I can acceptably eat it most days of the week? I’m in heaven (Although, if we’re being honest, I have been known to eat boiling hot soup in the dead of summer, too). Now that the leaves have started to change and we’re officially in the autumn months, it’s time to start making soup in my house.
The best types of soups, in my opinion, are the ones that are deeply flavorful but simple in ingredients and preparation. I’m a sucker for noodle soups — I’d gladly eat my weight in any spicy ramen, pho, or udon situation — but the noodle soup I grew up eating on a weekly basis, and therefore ranks number one in my heart, is sopa de fideo, or Mexican noodle soup.
Traditional fideo noodles come packaged one of two ways: as long noodles dried into little nests or short noodles that resemble cut up spaghetti, around an inch long. Fideos are made of durum wheat and water and are then rolled out, dried, and cut to a thickness between angel hair and spaghetti (although I’ve seen pasta the thickness of spaghetti in some dishes). Aside from the textbook definition of fideo as a thin, straight noodle, many Mexican families, mine included, think of fideos as all different shaped noodles that can be used in sopa de fideo. Some popular shapes are estrellas (stars), letras (letters), semillas de melon (melon seeds) and conchitas (little shells).
Sopa de fideo is a unique dish in that it’s one of the very few Mexican dishes formed around pasta. Aside from the birria ramen trend that has gained popularity in Southern California over the last few years and the general Mexican love for instant cup noodles (covered in lime and Tapatío, of course) there are only a few fideo, or noodle, dishes in traditional Mexican cooking. Sopa de fideo is likely the most popular one, and for good reason — it’s easy, filling, cozy and cooks even faster than a pot of Spanish rice.
The history of Fideos unfolds alongside the history of trade and colonialism between Italy, Spain and Mexico, or “New Spain” as Spanish settlers called Mexico City and surrounding areas. Some historians believe that noodles were brought to both Italy and Spain by Arab nomads. Likely introduced to Spain between the eighth and ninth centuries, these noodles are said to have become known as the fine, thin fideos known today, which were then eventually taken to Mexico during Spanish colonization.
Even indirectly, the dish many Mexicans know as sopa de fideo has a pretty obvious precursor: spaghetti. In his book Que Vivan Los Tamales!: Food and the Making of Mexican Identity, food historian Jeffrey Pilcher says that “Italian dishes appeared prominently in the cuisine of New Spain. Spaghetti with tomato sauce became a common dry soup, fideos.” Although the exact pathway of how spaghetti turned into sopa de fideo from Italy to Spain to Mexico isn’t clear, I can imagine that Mexican cooks began to adapt dishes brought by the Spaniards (some foods with Italian roots) to suit their tastes and cooking methods. Sopa de fideo, although technically a soup, isn’t traditionally very soupy. My guess on the creation of the dish is that it has something to do with adjusting cooking methods for Spanish rice to suit pasta. Since rice absorbs more water than pasta, using a Spanish rice recipe to cook noodles would yield enough liquid to become something between a dry pasta dish and a soup.
Even at first glance, the method for cooking sopa de fideo is quintessentially Mexican. If you can make a pot of arroz rojo, or Spanish rice, you can make sopa de fideo. In the most simple iteration of the dish, thin, broken up noodles are browned in oil before adding onion, garlic, tomato sauce, chicken broth, and spices and simmering until the pasta is tender. This is the exact same process as arroz rojo. The Mexican culinary love for toasting dry starches in oil is as necessary as South Asian cooks blooming their fresh spices in oil — it adds depth, smokeyness and brings out hidden flavors.
I’ve had my mom’s sopa de fideo for dinner more times than I could count. We would eat it for dinner when Mama was too tired to cook anything else, or if the fridge looked a bit empty and we hadn’t gotten around to grocery shopping yet. Like when we made chilaquiles to use up stale tortillas, sopa de fideo is a meal that uses things we almost always already had, which helped my family cut down on buying unnecessary groceries and creating excess food waste. Mexican food culture is truly one of the original low-waste lifestyles.
Our pantry was normally stocked with all different shapes of fideos but most of the time, Mama liked to make sopa de fideo with pasta that looked like tiny shells. My grandma fed the small concha-shaped noodles to my mom when she was young, and Mama carried on the tradition with her children. Mama made her sopa extra garlicky, and usually topped the finished dish with shredded yellow cheese. Whenever I sit down to a bowl of sopa de fideo, it feels like I’m 12 again, being warmed up by hot noodle soup during those chilly mojave desert autumn nights.
Aside from the lovely nostalgia I get from a good bowl of sopa de fideo, its other prime attraction is that the dish is actually ridiculously easy to make. But, if you’re in the mood to dress it up, it’s equally as cooperative. Adding shredded chicken, cilantro, avocado and cheese makes sopa de fideo filling and photo-worthy, but it’s just as delicious all by itself. Just toast the noodles, add garlic, onions, tomato sauce, chicken broth, and spices, and you’ll have a delicious meal in less than 30 minutes. You can also make sopa de fideo without all the spices and it’ll be just as tasty, but a bit more mild.
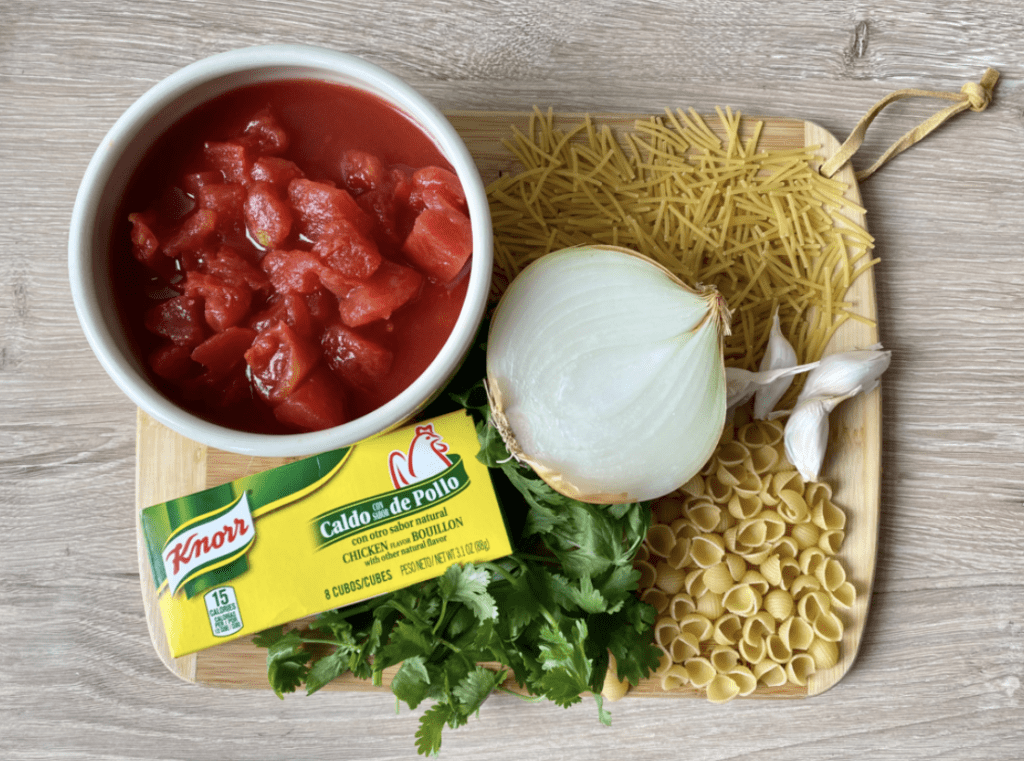
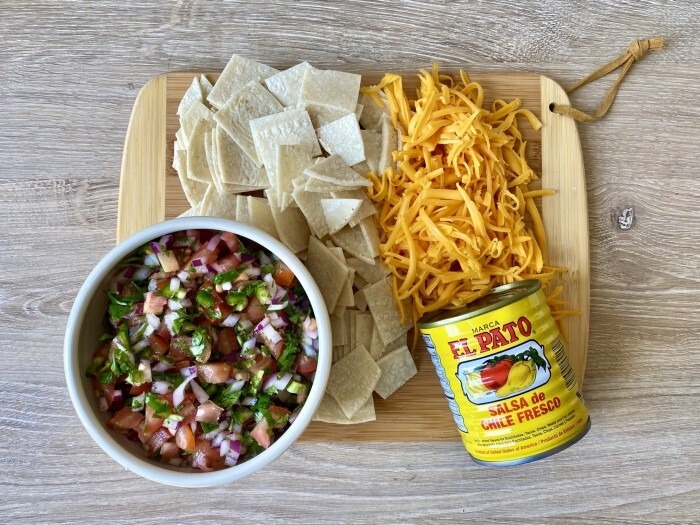
Photo of ingredients for sopa de fideo by the author.
Sopa de Fideo (Mexican Noodle Soup)
Yield: 4 servings
Time: 20-45 minutes
Ingredients
- 1 ½ lbs. boneless skinless chicken breast or thigh (optional)
- 2 tbsp. neutral cooking oil (preferably canola or vegetable, but olive oil works in a pinch)
- 2 cups pasta (fideos, shells, estrellas, letras, or thin spaghetti, broken up into 1 inch pieces)
- 1 cup Pato sauce or tomato sauce
- 1 cup canned diced tomatoes
- ½ medium yellow onion, finely diced
- 3 cloves garlic, minced
- 4-5 cups chicken or vegetable broth (depending on how soupy you want your fideo)
- ¼ tsp. (preferably Mexican) oregano (optional)
- ¼ tsp. red chile powder (optional)
- ¼ tsp. cumin (optional)
- Salt, to taste
- ⅓ cup queso fresco or shredded cheese, for topping (optional)
- ¼ cup roughly chopped cilantro, for topping (optional)
- 1 large avocado, thinly sliced, for topping (optional)
Preparation
Step 1
If making with chicken, heat a large pot of salted water over high heat until boiling. Lower to medium heat, add chicken and cook until cooked through and tender, about 20-25 minutes. Place cooked chicken on a plate and set aside. Shred once cooled.
Step 2
Heat oil in a large pot over medium-high heat. Add in pasta of choice and brown, stirring constantly, about 2-3 minutes until pasta is golden and toasted. Lower heat to medium-low. Add onion and garlic and sauté another minute until onion begins to turn translucent.
Step 3
Pour in tomato sauce and diced tomatoes, stirring to combine. Allow mixture to come to a slight simmer, until you can see small bubbles around the perimeter of the pot.
Step 4
Add in chicken broth and season with oregano, cumin and a pinch of red chile powder (optional). Stir to combine. Turn heat up to medium and simmer until noodles are tender, about 15 minutes.
Step 5
If you cooked chicken, add it back into the pot. Add salt to taste. Serve cooked fideo into four bowls and top with cheese, chopped cilantro, and thinly sliced avocado.
If you told me a year ago that at 22, I’d be fresh out of virtual college, unemployed, making dinner every night and folding a man’s underwear for him, I would have had a good laugh. But it’s not as funny when it’s reality.
When the pandemic hit New York City in early March, I was in my last semester of undergrad, about to graduate with a journalism and English literature degree from NYU. I had a lease with two roommates that was expected to last through the summer, an amazing university job that was supposed to be guaranteed until late August, and plans to apply for full-time jobs and culinary schools through summer.
As if the circumstances weren’t already terrible, in May, everything in my life fully went to shit. The pandemic was in a full, angry rage, and it did not care about my senior year of college. I presented my thesis project via a Zoom call and I watched my graduation “virtual tribute” on a laptop the day I was supposed to be throwing my graduation cap in the air at Yankee Stadium. I was laid off from my beloved NYU job. Then, the day after “graduation,” my roommates aggressively demanded that I move out of the apartment so that they could break the lease. I had less than a week to find a new place to live, and I couldn’t just fly back to my home state like everyone else was doing (thanks to my compromised immune system).
So, after my partner and I found a new apartment and moved all of our shit out to Brooklyn, we started a new quarantine life. He worked from home every day, and took full command of the desk I once used to sit at to write critical theory essays and complete Spanish homework. I started to become resentful towards my partner’s situation. A year ahead of me, he graduated from college with a normal ceremony, had the summer to work a part-time job and fool around at bars with his friends. He worked fellowships in the fall, and soon after, acquired a full-time salaried journalism job at a huge company making very good money. I had just graduated with the same degree, a resume full of internships and job experience, but into a failing economy and a job market that had lost over 20.5 million jobs as the unemployment rate jumped to 14.7%. With no schoolwork to complete and no job to occupy my time, I turned completely domestic.
As an impressively skilled home-cook and an obsessive cleaner, I used to joke that my ideal job was to be a housewife. Cooking and cleaning are both in my blood; the Mexican women in my family had drilled both skills into me from an early age. What could be a better job than to have no job, other than keeping the house in order? I loved to cook, and I kept my space spotless most of the time, anyway.
I thought that there wouldn’t be much else to do apart from basic cooking, cleaning, and the occasional gardening as a fun quarantine hobby. It turns out, domestic work requires a million micro-tasks — like organizing the fridge, straightening up the living room, and making the bed — that, at the end of the day, made me feel simultaneously like nothing had gotten done, and that I had just done a full day of unpaid work.
Almost every day, I managed to not sit down:
9:30 a.m. — Wake up and check email for any job interview offers.
10 a.m. — Make bed and tidy up the bedroom, living room and kitchen.
10:30 a.m. — Cook breakfast for my partner.
11 a.m. — Eat breakfast.
11:30 a.m. — Clean kitchen.
12 p.m. — Check/water all the plants I’ve acquired since the start of quarantine.
12:30 p.m. — Do laundry.
2:30 p.m. — Fold clothes (including, but not limited to my partner’s underwear).
3 p.m. — Go grocery shopping.
4 p.m. — Apply for jobs or write articles (alternating days).
5:30 p.m. — Exercise.
6 p.m.— Shower.
6:30 p.m. — Cook dinner.
8 p.m. — Eat dinner.
8:30 p.m. — Clean kitchen (again).
9 p.m. — Watch TV.
11 p.m. — Sleep.
It was the small tasks throughout the day that I completed between the scheduled chores like laundry and grocery shopping that seemed to drain me the most. Things like folding throw blankets that my partner and I used the night before, or dusting all shelves in the apartment frequently took up more time than I would have liked them to — both in practice and just thinking about them. The checklist in my brain got progressively fuller and fuller, never allowing me to relax or take any downtime until the full list was checked off at the end of the day. I would not, and could not, leave anything until tomorrow — and if I did, it would eat me up.
Though the apartment is perpetually clean and there are almost always elaborate dishes on the table at dinnertime, it turns out that I’m not exactly cut out for domestic labor. Every night when I got in bed, I felt equal parts unproductive and exhausted from all the things I had done. I had been raised to be independent and mostly unreliant on others, but without a job and especially after the extra $600 per week unemployment payments ended, I felt like I was relying more and more on my partner’s income. It made me feel weak, but worse, it made me feel dependent on him. He was suddenly paying for groceries and take-out meals that we used to split the cost of. He bought things for the apartment that I couldn’t afford myself. It seemed like he felt bad — that I was at such a shit point in my life — and wanted to pay to make it easier for me. After all, he had a stable income and I didn’t.
With little to do but housework, my entire identity slowly became all cooking and cleaning. Conversations with my partner centered around home-decor that I liked and meals that I would make for dinner that week. With no friends to see, very few people to talk to on a regular basis, and virtually no job interviews offered to me, I got stuck in a loop of believing that my self-worth was tied only to things that I could do for money. It didn’t matter that I was putting lavish meals on the table every night, or that I started a passion project of writing about my family’s recipes, because I was virtually alone and seemingly unemployable.
It took this experience to realize that domestic labor isn’t easy, and being a housewife is not the cushy lifestyle I thought it would be. I come from a working family, where none of the women had (what I thought was) the luxury to stay at home to raise children and take care of a household. My mom, a single mother, always worked full time, then came home and made dinner for us. It’s clear to me now though, that part of the labor of homemaking is holding on to a sense of self. It’s the best (or worst, in my case) exercise in not allowing your job to define you, and remaining self-realized through a day full of tiny tasks that seem insignificant but still need to be done.
Thankfully, I have a job now, and my little chores seem less important than they did when they were my whole purpose. Maybe it’s that I have less time to worry about things like taking the trash out or organizing the pantry, but I’ve come to terms that everything will never be completely finished. Even when it was my whole purpose to clean and organize and cook everything, I couldn’t do it all. There will always be more little things to do tomorrow, or the next day, and I’m better off without trying to do them every day. Now, I can gladly skip the vacuuming, or leave the bed a mess for one day, but, come the weekend, everything on the checklist must be crossed off.
We’re in the middle of Latinx Heritage Month, and this time of year always has me considering my Latinidad a little bit more thoughtfully than usual. I’ve started to think a lot about how, for many Mexican people in the United States, our food culture has evolved — and is invariably tied to this country. Mexican influences appeared on a national scale with the introduction of Mexican-American fast food chains like Chipotle and Taco Bell. There are also entire regional cuisines like Tex-Mex, New Mexican, and Baja Californian food that have evolved from more traditional Mexican roots to mix with American tastes, indigenous influences and local ingredients.
One meal that I’ve always considered distinctly Mexican-American is the hard shell taco. A crunchy fried corn tortilla shell is used as a vehicle for chili powder-spiced ground beef, shredded cheese, lettuce and tomato and is one of the most discredited Mexican-American dishes. I’ve seen many iterations of this dish, from the pre-made Old El Paso taco shell at “taco nights” I had at white friends’ houses to the Taco Bell Doritos Locos Taco that should have never been made. Tacos have been a trendy food, the subject of early memes and a fashion trend all within the past decade. A mid-2000s pop-culture craze had everything plastered with illustrated tacos and taco puns (remember the Forever 21 Taco Bell collab?). And while some are quick to dismiss hard-shell tacos as un-Mexican, I’ve come to recognize that the hard shell taco holds an exceptional space in Mexican-American food history, as something exploited by American fast food and then reclaimed by Mexican cuisine.
Hard shell tacos, as they exist today, are a testament to the evolution of authentic Mexican food and the development of Mexican-American cuisine. Jeffrey M. Pilcher, professor of history at the University of Minnesota and taco history expert notes that “a lot of Mexican American tacos are really adaptations of Mexican food to the ingredients that are available through the U.S. food-processing industry.” In Mexican American food history, as Pilcher points out, we see hamburger meat replacing offal meat and ingredients like cheddar cheese and iceberg lettuce being more and more incorporated into the Mexican-American diet.
Tacos are said to have originated from Mexican silver mines in the 18th century, with the first mention of them in the United States recorded in a newspaper in 1905. The crispy, hard shell version is likely an adaptation of Tacos dorados, an authentic Northern Mexican food. They are assembled with soft corn tortillas, filled with ground meat and pinched or rolled shut and fried until crisp. Hard shell tacos as they exist today, with an open-top fried shell were created by Mexican-American restaurateurs. According to Pilcher, the original patents for preformed taco shells were awarded to Mexican restaurant owners in the 1940s. Despite this history, Glenn Bell, the founder of Taco Bell, is largely credited with the creation of hard shell tacos. Taco Bell, a white-owned company, took a Northern Mexican dish and the idea of Mexican restaurateurs to create pre-formed shells, and exploited them both for profit. The chain restaurant also disrupted the history of the hard shell taco by taking credit for its creation, when in actuality hard shell tacos have roots in regional Mexican cuisine and Mexican-American restaurants.
Taco Bell’s problematic nature comes from more than just their exploitation of Mexican-American cuisine, their chemically-green Baja Blast and the mystery meat. From the inception of the chain, it was never founder Glen Bell’s intent to sell Mexican food to Mexican people. According to Professor Pilcher’s research, none of Taco Bell’s original franchises were located in predominantly Mexican neighborhoods though the chain was founded in Southern California, which is home to numerous areas with large Mexican populations. Instead, as Pilcher puts it, Bell sought to allow “Americans of other racial and ethnic groups to sample Mexican food without actually going in to Mexican neighborhoods.” The white man-founded taco chain wanted to serve Mexican-American food, but not be associated with Mexican-American communities.
This exploitation of Mexican food influences has changed Mexican-American food forever, but it’s not the end of the hard shell taco story. Once the crispy taco reached huge popularity due to Taco Bell’s far reaching franchise system, Tex-Mex restaurants began making their own pre-formed taco shells as well, by clipping the tortillas to bent coffee cans and frying them. From there, crispy-shelled tacos expanded everywhere. They showed up on the menus at Mexican restaurants nationwide, including my family’s own favorite haunts: a reclamation of a dish from those who exploited it for fast-food.
I grew up eating hard shell tacos as well as the more traditional taqueria-style tacos with soft corn tortillas. My abuela loves hard shell tacos with chicken, while my mom frequently made them with ground beef, shredded yellow cheese and lettuce and tomato. My family ate hard shell tacos for dinner almost as often as we had carne asada. Mama would cook a big skillet of ground beef, seasoned with garlic, onions, cumin and chile powder. Abuela would fry the shells, one at a time, folding them at just the right angle to fit all the fillings in before letting the oil drip off on a paper towel. We ate them so much that Mama developed her own way of eating them, with Tapatío hot sauce added on top of the meat and cheese but before any other toppings. “I don’t need my lettuce to be spicy,” she used to tell me.
Hard shell tacos were so instrumental to our family, that my younger sister even had a children’s book called “Mud Tacos,” which my mom read to her almost every night. The story details how the kids in the book make mud tacos to replicate their abuela’s hard shell “crispy, crunchy, spicy tacos” before eating actual tacos for dinner at the end. If anything, “Mud Tacos” showed me that hard shell tacos are pivotal to many families’ Mexican-American experience.
That experience often comes with homemade taco shells. I don’t think pre-made taco shells have ever been in my grandparents or my mom’s home. Frankly, I think store-bought shells give hard shell tacos a bad name. They are almost always stale and will never give the same mouthwateringly fatty effect that homemade taco shells do. If you take one piece of advice from me, let it be this: fry your own taco shells.
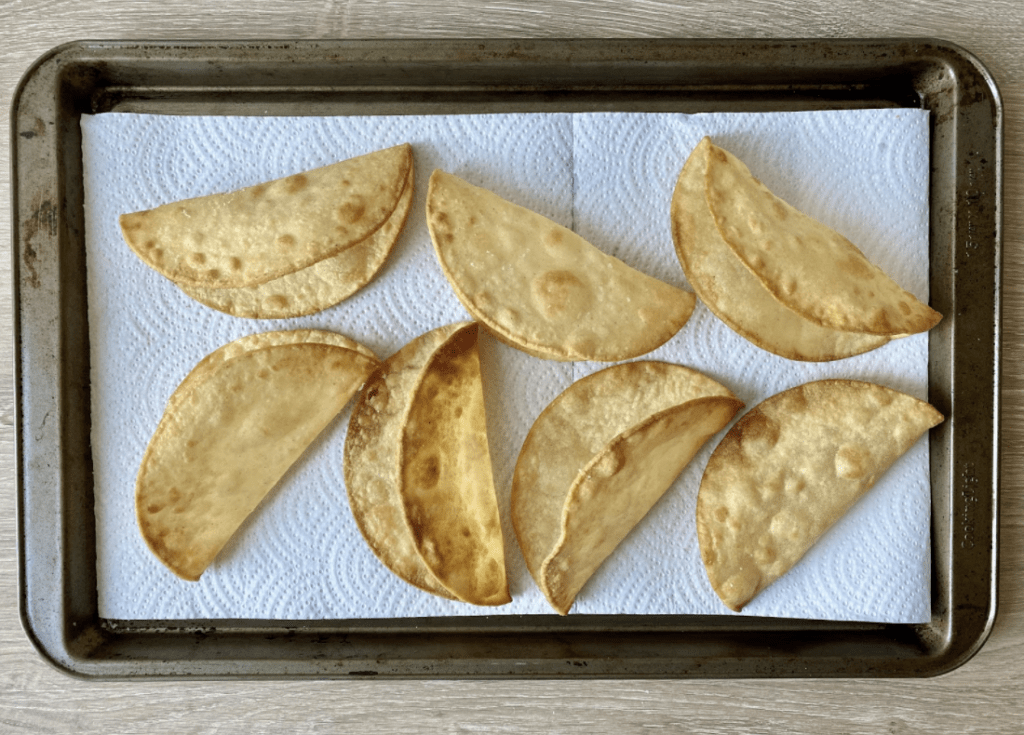
Photo of fried taco shells by author.
I made hard shell tacos for my partner for the first time a few weeks ago. We try to do taco Tuesday nearly every week, as a good excuse for me to cook Mexican food. I hadn’t eaten hard shell tacos myself for quite some time; a few years of avoiding cooking fried foods in the name of health had caused me to drift away from the shatteringly crispy homemade taco shells. Ground beef, shredded yellow cheese, shredded lettuce and chopped tomatoes made up our tacos. I always top off with Tapatío hot sauce (but then again, there are few things I won’t put Tapatio on) and serve with arroz y frijoles. Upon his first bite, my partner looked at me and told me, “This is everything Taco Bell was trying to be.”
He’s not wrong. The main components of a Taco Bell taco are all there. And while I will never condone eating from Taco Bell, the concept of a classic hard shell taco can be made into a delicious meal when executed correctly. The recipe is simple, and the toppings are easily accessible. The ground beef can easily be swapped for ground turkey, chicken or a vegan meat substitute. The only thing that is non-negotiable is frying your own taco shells. It is every bit worth the effort.
Hard Shell Tacos
Yield: 6 tacos
Time: 30 minutes
Ingredients
- ½ cup plus 1 tbsp. neutral cooking oil (canola or vegetable)
- 1 tsp. ground ground beef, 80/20 fat
- ¼ cup yellow or white onion, finely chopped
- 2 cloves garlic, minced
- 3 tsp. red chili powder
- ½ tsp. cumin
- 1 tsp. oregano (preferably Mexican)
- 1 tsp. plus a pinch of salt
- 6 corn tortillas
- ½ cup shredded cheese
- 1 cup shredded lettuce
- 2-3 tomatoes, diced
- Hot sauce (Tapatío, preferably) for topping (optional, but highly recommended)
- Mexican crema or sour cream for topping (optional)
Preparation
Step 1
Heat 1 tbsp. oil in a large skillet over medium heat. Add onions and garlic and sauté until onions begin to turn translucent, about 45 seconds. Add in ground beef and brown for 5-6 minutes until meat is fully cooked but not browned. Drain off all but about 1-2 tbsp. excess fat.
Step 2
Turn heat up to medium-high and brown meat for 2-3 more minutes or until it begins to sear on all sides. Season with chili powder, cumin, oregano and salt.
Step 3
Heat ½ cup oil in a small skillet over medium heat until oil reaches 350 degrees. Using tongs, place one tortilla in the oil. Cook for 20 seconds, then flip and cook for an additional 20 seconds. Hold down the center of the tortilla with a wooden spoon, while gently folding one end of the tortilla up with tongs to create a crease. Hold the tortilla open with the tongs, and cook for 15-20 seconds. Flip the tortilla and cook the other side for 15-20 seconds. Do not press the tortilla down while frying, as this will create a shell that’s too narrow to hold fillings.
Step 4
Place the cooked shell on a paper towel-lined baking sheet and sprinkle it with salt while it is still hot. Repeat the process with remaining tortillas.
Step 5
Fill the taco shells with meat, cheese, lettuce, tomato, sour cream and hot sauce. Serve with rice and beans.
Over the last few years, I’ve been trying to reduce my food and plastic waste. I shop at zero-waste stores when possible, and have swapped out a number of household items like dish brushes and shower loofahs for plastic-less alternatives that can be composted at the end of their life. I also compost all food scraps that come out of my kitchen.
This lifestyle change has made me realize how much Mexican culture unconsciously reduces waste. Mexican culture, at least in the way I was raised, leaned more toward environmental friendliness than typical American culture. When I was a child, my grandparents frequently reused butter or cool-whip containers as tupperware, giving single-use plastic an extended life. New meals weren’t cooked until all leftovers were eaten, and often, dishes would be centered around products we already had in the house, so every grocery item bought was used. When I’d visit my non-Mexican friends’ homes for dinner, I’d often see them scraping uneaten food from dinner into the trash. In my house, leftovers were eaten by another family member, saved to eat another day, or repurposed for new meals. Corn grilled one day as a side dish with carne asada would be used in calabacitas (a sauteed zucchini and corn dish that is covered in cheese) the next. A large pot of beans would be used for days — for quesadillas, burritos or tostadas. But by far, my favorite meal that helped reduce food waste is a breakfast dish my mom made for me every weekend, called chilaquiles.
Chilaquiles — the perfect solution for tortillas that are no longer fresh enough to eat on their own — consist of cut up corn tortillas, lightly fried, sauteed with red or green salsa, cheese, and topped with a fried egg. The dish is best made with tortillas that have seen better days because they tend to crisp better.
The word chilaquiles comes from the Aztec Nahuatl word for chiles and greens. The dish itself was created to be made with leftover tortillas, highlighting the thriftiness of Mexican food culture. Recipes for chilaquiles in the United States have been dated back to 1898, where they were featured in Mexican-American chef Encarnación Pinedo’s cookbook “El Cocinera Español” (The Spanish Cook). “El Cocińera Español was the first cookbook written by a Hispanic writer in the U.S., and held the first recipes for Californio food: made by Spanish-speaking people born in California.
Where American kids had pancakes and bacon for Sunday morning breakfasts, I often had chilaquiles con huevo. Nearly every weekend, Mama would wake up around 11 a.m., pajamas still on, and head to the kitchen to fry tortillas and eggs for our weekly chilaquiles breakfast. The smell is unmistakable — savory, aromatic and a little tangy. The sound of tomato sauce hitting the pan with the fried tortillas and sizzling oil was enough to get me out of bed even on the laziest days. Chilaquiles were the perfect comfort food when I was a child, and now, they just might be the ideal breakfast after a night of one-too-many drinks.
I’ve had plenty of chilaquiles in restaurants, and almost every plate I’ve had has been prepared differently. Chilaquiles have a lot of room for variation and experimentation with ingredients, as long as the three staples are included in some way: corn tortillas, sauce and cheese. They can be prepared casserole style, layered in a dish and baked, or slow-cooked until the tortillas break down into a polenta-like porridge. The sauce can be rich and chile-laden like an enchilada sauce, or tomatillo-based, like salsa, and cheese can range from crumbly Mexican types (queso fresco or cotija) to shredded yellow cheeses (cheddar or colby jack).
Despite the large variety of cooking methods, in my eyes, nothing will ever quite top the simplicity of my mom’s Mexican-American breakfast dish. Avoiding a complicated and time-consuming sauce, Mama typically uses either canned Pato sauce (spicy Mexican tomato sauce) or regular tomato sauce after frying the tortillas. She lets them soak up the tangy spicy sauce for a moment, giving the dish a melty, chewy texture. When covered in shredded yellow cheese, and topped with a fried egg and fresh crema and salsa, the dish becomes savory, fatty, spicy and acidic in all the best ways.
When I make chilaquiles, I take Mama’s recipe one step further and add my favorite soy chorizo and a freshly made pico de gallo. The dish leans a little fatty and greasy, so the fresh component of the pico de gallo gives a great burst of acidity and brightness.
Feel free to use regular chorizo, shredded chicken or even pork carnitas to give the meal a little heft. Any salsa or tomato sauce will work, and cheeses can be substituted as well. This recipe is easy to riff off of.
Chilaquiles ingredients by Jae Thomas.
Chilaquiles
Yield: 4 servings
Time: 30 minutes
Ingredients
For the Chilaquiles
- 10-12 corn tortillas, cut into 1 inch squares
- 3 tbsp. neutral oil, like canola or vegetable oil for frying
- ⅔ cup Pato sauce or tomato sauce
- 3 oz. chorizo or soy chorizo (optional)
- ⅔ cup shredded cheddar or colby jack cheese
- Fried eggs, for serving (not optional, in my opinion)
- Crema, for serving (optional)
- Avocado, for serving (optional)
For the Pico de Gallo
- ½ yellow or red onion, finely diced
- ½ cup cilantro, leaves and tender stems, finely chopped
- 3 medium tomatoes, diced
- 1-2 jalapeños, seeds removed and finely diced
- 1 clove garlic, minced
- Juice of 1-2 limes
- ¼ Tsp cumin
- 1-2 pinches oregano (preferably Mexican)
- Salt, to taste
Pico de Gallo Preparation
Step 1
Add all ingredients to a bowl and mix until combined. Season to taste with salt.
Chilaquiles Preparation
Step 1
Heat oil in a large skillet over medium-high heat. Test the oil heat with a few drops of water. If the oil sputters a bit, the oil is hot enough to add the tortillas in. If the oil sputters a lot, your pan is too hot. Lower the heat and try again in a few minutes. Be sure when frying the tortillas that the oil is not too hot, or you’ll end up with tortilla chips instead of chilaquiles. The desired texture for the tortilla pieces is crispy edges with a soft middle.
Step 2
When the oil has reached the desired temperature, add in the tortillas. Cook for about 5-6 minutes, stirring occasionally, until the edges of most pieces have gotten slightly crispy. Do not over-mix, as the tortillas will break up too much.
Step 3
Lower heat to medium. Add in the chorizo after step 2 and stir fry until cooked through OR cook chorizo in a separate pan and add to the top when the dish is ready to be served.
Step 4
Lower heat to medium-low. Working quickly, add in Pato or tomato sauce, stirring only once or twice to coat the tortillas in sauce. Season with salt, pepper and garlic powder. Stir once more to distribute seasonings.
Step 5
Add cheese to tortilla mixture. When melted, top with fried eggs and pico de gallo, plus crema and avocado slices, if desired.
Summer will tragically be coming to an end soon. I am not ready to face that reality yet, so until I come to terms with the changing of the seasons, I will be happily sunbathing in denial and sipping nothing but aguas frescas — specifically agua fresca de jamaica — all day long.
When steeped and sweetened, flores de jamaica (hibiscus flower, pronounced ha-may-kah) gives off intense fruit punch vibes. If you’ve ever had it, you know that it can easily be mistaken for a mixed berry drink like a cran-raspberry cocktail. A glass of agua de jamaica is everything you need for a bit of escapism — while drinking it, I like to pretend like summer is endless and that I’m having a drink in the Southern California sun.
Aguas frescas (translated literally: fresh waters) are drinks made of fresh fruits, sugar, grains, or herbs — often blended with ice cold water and lime juice. They are popular in a number of Latino cultures, but some of the most famous ones, like horchata and jamaica, are quintessentially Mexican. In many parts of Mexico, aguas frescas are consumed year-round, with flavors varying depending on what fruits or flowers are in season. Flavors like jamaica, mango, pineapple, and watermelon are usually served in the summer, when they are in season and easily accessible. I’ve seen winter agua frescas in California made with orange and tangerine.
Mexican folklore says that the first agua frescas were made by Aztecs, from fruits gathered around Tenochtitlán and chilled with ice from nearby dormant volcanoes, Popocatépetl and Iztaccíhuatl. Though not native to Mexico (the flowers have a disputed origin between Africa and India) jamaica flowers came to the country during colonial times. A traditional remedy for high blood pressure, the flowers are most popularly steeped into a concentrate and used in agua frescas and paletas (Mexican popsicles).
I can’t think of agua de jamaica without thinking of Calle Olvera, the beloved Mexican marketplace, in Downtown Los Angeles. Part of the El Pueblo de Los Angeles Historic Monument, Calle Olvera is a narrow block full of vibrant puestos (market stalls), museums, and hole-in-the-wall cafes. My family trips to Olvera Street consisted of browsing the handmade pottery, jewelry, and leatherwork sold by the vendedores, many of whom are descendants of the original Calle Olvera sellers of years past. We admired the delicate embroidery on traditional folklorico dresses and listened to live mariachi music in the plaza. When I was young, Calle Olvera was a place for me to learn about my heritage through art and food. I bought countless trinkets and enjoyed Mexican street food — my favorite part of the marketplace — while my mom and grandparents taught me the history of Chicano people in Los Angeles, and how I was a part of it.
As the oldest section of Los Angeles, the market has kept Mexican culture and traditions alive for nearly a century, with festivals like Día de los Muertos and Las Posadas, a nine-day Christmas celebration. But due to the Coronavirus, Olvera Street has been shut down since March, with the exceptions of a few restaurants that have switched over to takeout and delivery. Merchants are struggling, with many asking the city of Los Angeles for help with rent. Vendors have fallen behind on their payments in recent months, threatening the future of Calle Olvera as a whole. I fear that this will happen, especially as I think about all the beautiful memories my family and I have made at the marketplace and the connections with certain dishes that our trips have created.
We finished every Calle Olvera trip with a meal at Cielito Lindo, a tiny stall cafe specializing in freshly-made taquitos and avocado salsa (which is still open for takeout and delivery, I might add). The restaurant is endearingly cramped with a few metal tables scattered in a three-walled dining room that is fully open to the marketplace in the front. The walls, slated with hand-painted Talavera tiles, showed off delicately painted flowers in vibrant shades of pink — the ideal backdrop for an equally vibrant meal.
My order at Cielito Lindo was always the same: chicken taquitos — topped with sour cream and avocado salsa — and a large agua fresca de jamaica. The jamaica was displayed in an oversized, clear-glass agua fresca barrel, alongside other aguas like horchata (sweet rice milk with cinnamon) and agua de tamarindo (tamarind punch). The beverages were served in a large styrofoam cup, filled to the brim with crushed ice, and topped off with a red plastic straw. That disposable vessel of hibiscus tea was the most welcome respite from the sweltering Los Angeles heat, and a symbol of family outings.
My draw to agua de jamaica at this time has as much to do with my grandparents as it does with family trips to Calle Olvera. Agua de jamaica was more than a family outing treat. In the summers, there was almost always a pitcher of the floral-fruity punch brewing in my grandparents’ home. I remember my abuelo as the primary agua-maker, but my abuela argues that she was the one who always made it. Regardless of the real agua fresca master’s identity, everyone in my family gladly gulped down the deep magenta-colored tea whenever it made an appearance in an opaque plastic drink dispenser, ready to be served over ice.
In the summers of my childhood, I would regularly spend a week or two at a time at my grandparents’ home in The Valley of Los Angeles. Both retired, they would make every effort to keep me entertained while I was out of school. In the evenings, my abuela would lay out a cotton sheet on the grass in her front yard for us to sit on. My abuelo would lounge in a lawn chair on the porch. We all drank cups of agua de jamaica over ice, watching the sun sink below the Sweet Gum trees that lined their street.
There is little hope for a trip home any time soon, and even less hope for another meal at Cielito Lindo, so I often find myself longing for a bit of that hot-weather nostalgia. I wish I could be eating taquitos and chile rellenos with my family on floral Talavera-tiled tables and laughing over tart, sweet, agua de Jamaica, but because of this pandemic, it may be a long time until I can do that again. Making agua de jamaica is not just a grab for what is left of the fading summer for me (which it definitely is), but also an act of easing my yearning for my family.
Even if you don’t have the same sentimentality for aguas frescas that I do, agua de jamaica is worth the time it takes to make. A wonderful alternative to pre-made fruit punch and fruit juices, steeped jamaica is a thirst quenching drink perfect for a hot summer day. The sweetened tea can also be used to flavor alcoholic cocktails.
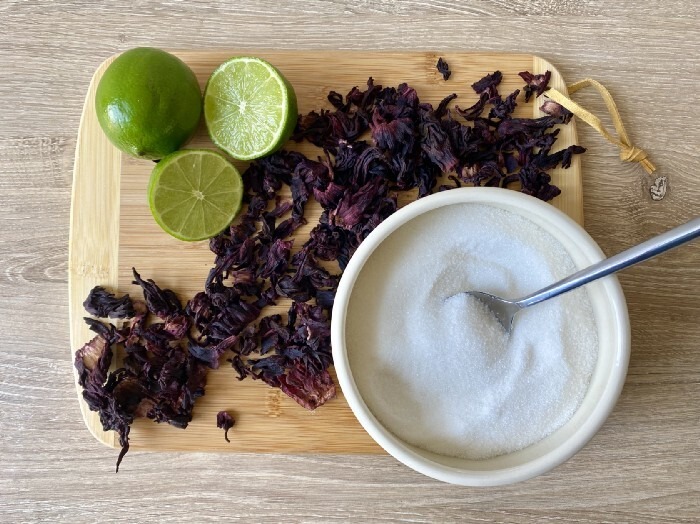
Photo of dried hibiscus flowers, lime, and sugar by Jae Thomas.
Agua Fresca de Jamaica (Hibiscus Tea)
Yield: 6 cups
Time: Roughly 1-2 hours (includes steeping and cooling time)
Ingredients
- 1-1 ½ cups dried flores de jamaica (hibiscus flowers)*
- ½-⅓ cup granulated sugar
- Juice from half a lime (or more, if desired)
*The strength of your agua fresca will depend on how fresh your dried flowers are. Older flowers are less potent, so adding a larger amount will lead to a better flavor.
Preparation
Step 1
Add dried flowers to a large pot and cover with 7-8 cups of cold water. Bring to a boil.
Step 2
Once water is boiling, remove from heat and let the flowers steep, anywhere from 30 minutes to a few hours, depending on desired strength. The longer you steep, the stronger the agua fresca will be. You can even steep it overnight, if you want a richly flavored tea.
Step 3
Let the mixture cool to room temperature, about 30 minutes. Once cool, strain and discard the flowers. Pour liquid into a large pitcher or jar.
Step 4
Squeeze in the juice from half a lime. Then, pour in sugar, ¼ cup at a time. Sweeten to taste, adding more lime juice and diluting with water, if desired. Serve over ice.